User Guide
How to use the learning system
For public students, registered students and tutors
Enrol in a tutorial course, sign in with your special ID and secret code, use your learning materials, videos, inbox and online classes.
Register, sign in, use the dashboard, inbox, courses, video tutorials, lecture notes, quizzes, assignments, the end of semester project, attendance and results.
Manage your courses and students, lecture notes, quizzes, attendance, assignments, exam projects, class participation, results and messages.
Edition November 2026
User guide
Everything you need to use the system, step by step, with pictures. Pick your part below, or download the whole guide as a PDF to read offline or print.
About this guide
This guide explains how to use the learning system. It is written for three groups of people, and each group has its own part:
- Part 1, Public students: people who are not registered students of the school but join a tutorial course from the main page. You sign in with a special ID and a secret code.
- Part 2, Registered (internal) students: students of the school with a matric number. You sign in with your matric number and password.
- Part 3, Tutors: lecturers and tutors who run courses, set work and give marks. You sign in with the user ID and password the administrator gave you.
Words in grey boxes, such as Sign in, are the names of buttons, links and menu items exactly as they appear on the screen. The administrator can rename some menu items and links, so a few names on your screen may differ slightly.
The main (login) page
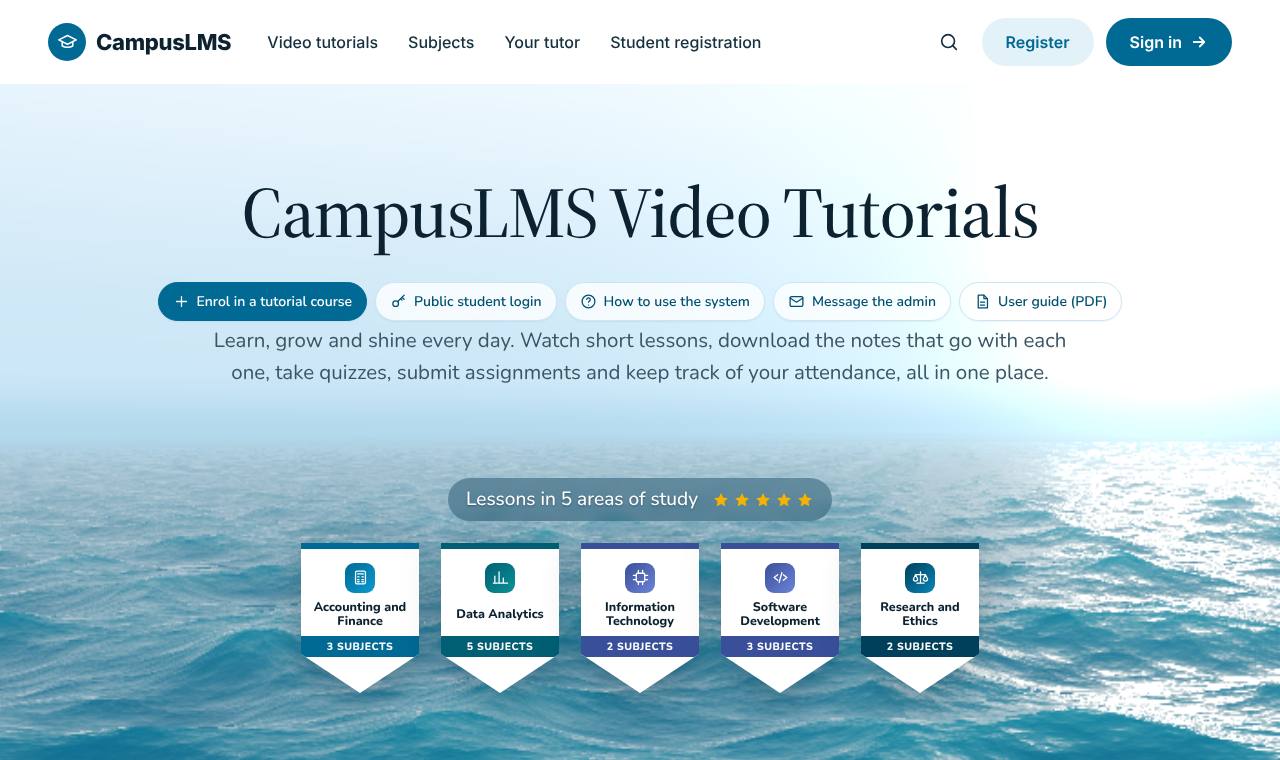
Everybody starts at the main page of the website. It is also the sign-in page. On it you find:
- Sign in and Register buttons at the top, for registered students, tutors and the administrator. The top bar stays at the top of the screen while you scroll, on every page.
- When the school has switched it on, a thin bar under the top bar with the school's contact number, email, address and opening hours. Tap the number to call, the email to write, or the address to open it in Google Maps.
- A row of buttons in the middle of the page, just before the welcome text: Enrol in a tutorial course, Public student login, How to use the system, Message the admin and User guide (PDF), plus the school's social media icons.
- Free video lessons that anyone can play, and for many of them a Download video link.
- Information about the tutor and the subjects taught.
When you scroll down to the bottom of any page, a round arrow button appears in the bottom right corner. Click it to go straight back to the top.
Devices, browsers and internet
- The system works on phones, tablets, laptops and desktop computers. Use an up-to-date browser: Chrome, Edge, Firefox, Safari or Opera.
- On a phone, menus fold away. Tap the ☰ menu button to show the menu, and use Back to the list to return from an opened item.
- Videos and large files use a lot of data. When you are on mobile data, consider downloading videos on Wi-Fi and watching them later offline.
- Do not share your password or secret code with anyone, and always sign out on a shared or public computer.
Part 1. Public students
For people who join a tutorial course from the main page and sign in with a special ID and secret code.
Who is a public student?
A public student is anyone who is not a registered student of the school but wants to take one of the tutorial courses that the school opens to the public. You do not need a matric number or a password. Instead:
- You enrol in a tutorial course and choose your own special ID.
- The administrator approves your enrolment and sends you a secret code.
- You sign in at Public student login with your special ID and secret code, and reach your learning area: materials, videos, messages and links to online classes.
1.1 Enrol in a tutorial course
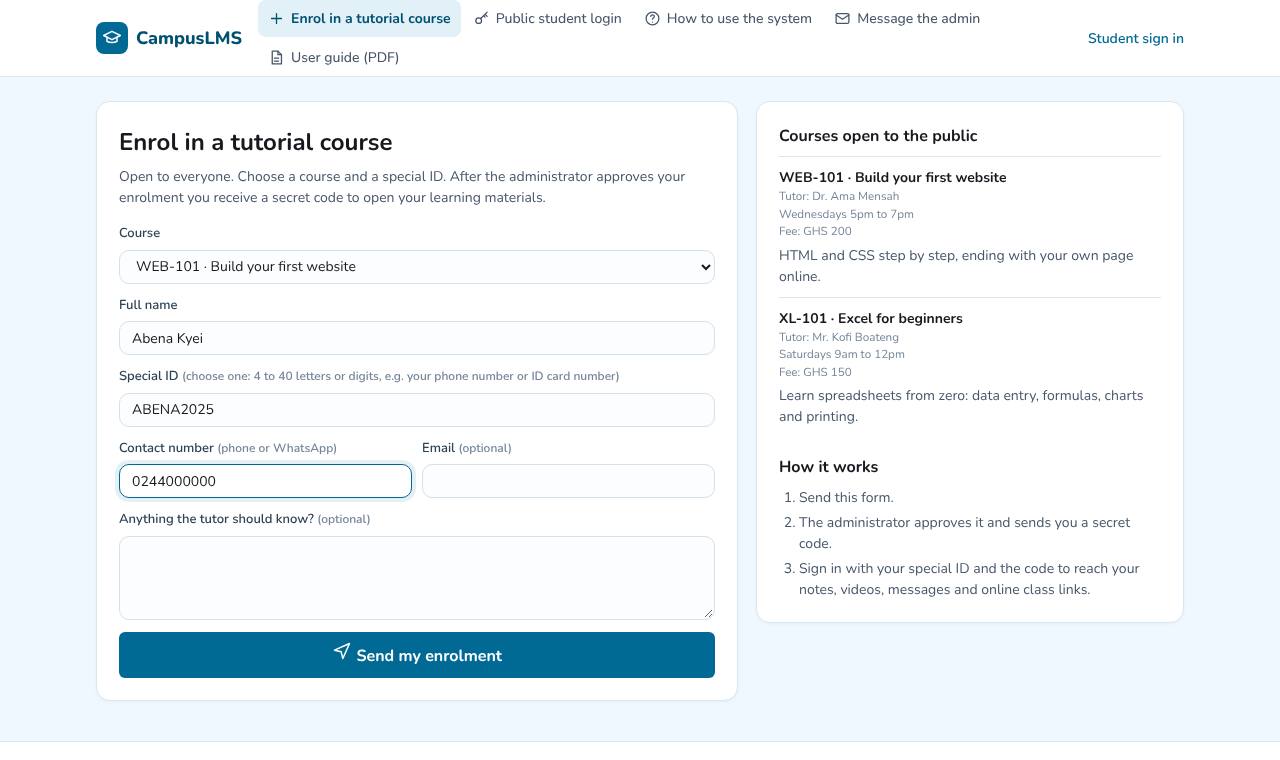
- Open the main page and click Enrol in a tutorial course.
- Read the list Courses open to the public. Each course shows its code, title, tutor, days and times, fee (if any) and a short description.
- In the form, choose the Course you want.
- Type your Full name as you want it to appear.
- Choose a Special ID. This is your personal sign-in name, for example KOFI2025 or your phone number. Use 4 to 40 letters and numbers (you may also use / . _ -); spaces are removed and letters become capitals. It must not already be used by somebody else. Write it down: you need it every time you sign in.
- Type your Contact number (phone or WhatsApp). It is required: the administrator uses it to send you your secret code and to reach you about your class. Use a number that works, for example 024 123 4567 or +233 24 123 4567.
- Optionally give an Email address too, to receive your code by email.
- Optionally write anything the tutor should know (your level, what you hope to learn, the best time to call).
- Click Send my enrolment. A Thank you page confirms that your enrolment was received.
1.2 Your special ID and secret code
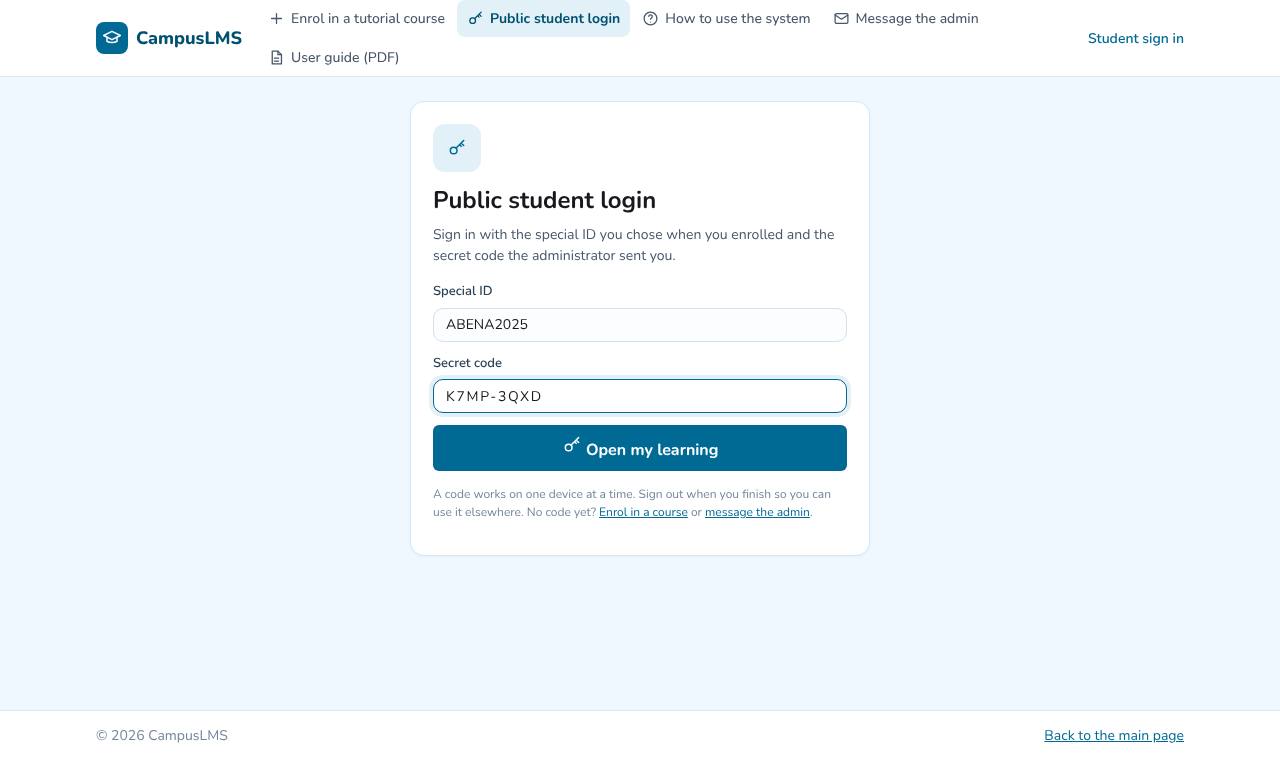
When the administrator approves you, they send your secret code by email, WhatsApp or SMS. A code looks like K7MP-3QXD: eight letters and numbers in two groups. It avoids letters that look alike, so there is no letter O or I and no number 0 or 1.
- The message also tells you your special ID and the date until which the code is valid.
- Keep the code private. Anyone who has your special ID and code can sign in as you.
- When the code expires, ask the administrator for a new one or for more time. The administrator can also change the expiry date.
- If you lose your code, ask the administrator: they can see it again or issue a new one (a new code stops the old one from working).
1.3 Sign in to the portal
- On the main page click Public student login.
- Type your Special ID.
- Type your Secret code. You may type it with or without the dash and in small or capital letters.
- Click Open my learning. Your learning area, My learning, opens.
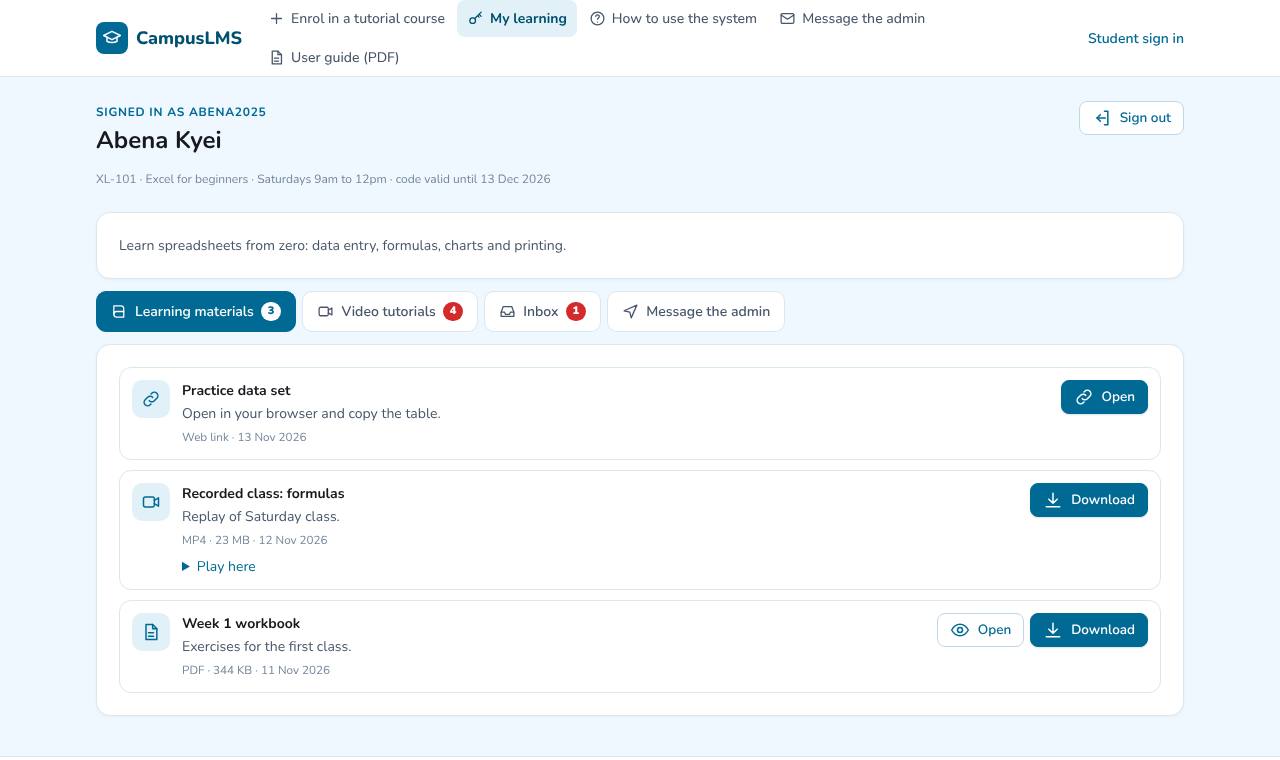
At the top of My learning you see your name, your special ID, your course with its days and times, and the date until which your code is valid. Under it are the tabs Learning materials, Video tutorials, Inbox and Message the admin. A number on a tab shows how many items it holds (on the Inbox tab, how many new messages).
1.4 Learning materials
The Learning materials tab lists everything the administrator added for your course: documents (PDF, Word, PowerPoint, Excel and others), videos and web links.
- Download saves the file to your phone or computer. Look in your Downloads folder afterwards.
- Open (PDF files) shows the document in a new browser tab without saving it.
- Play here (videos) plays the video inside the page. You can still use Download to keep it.
- Open on a web link opens the website in a new tab.
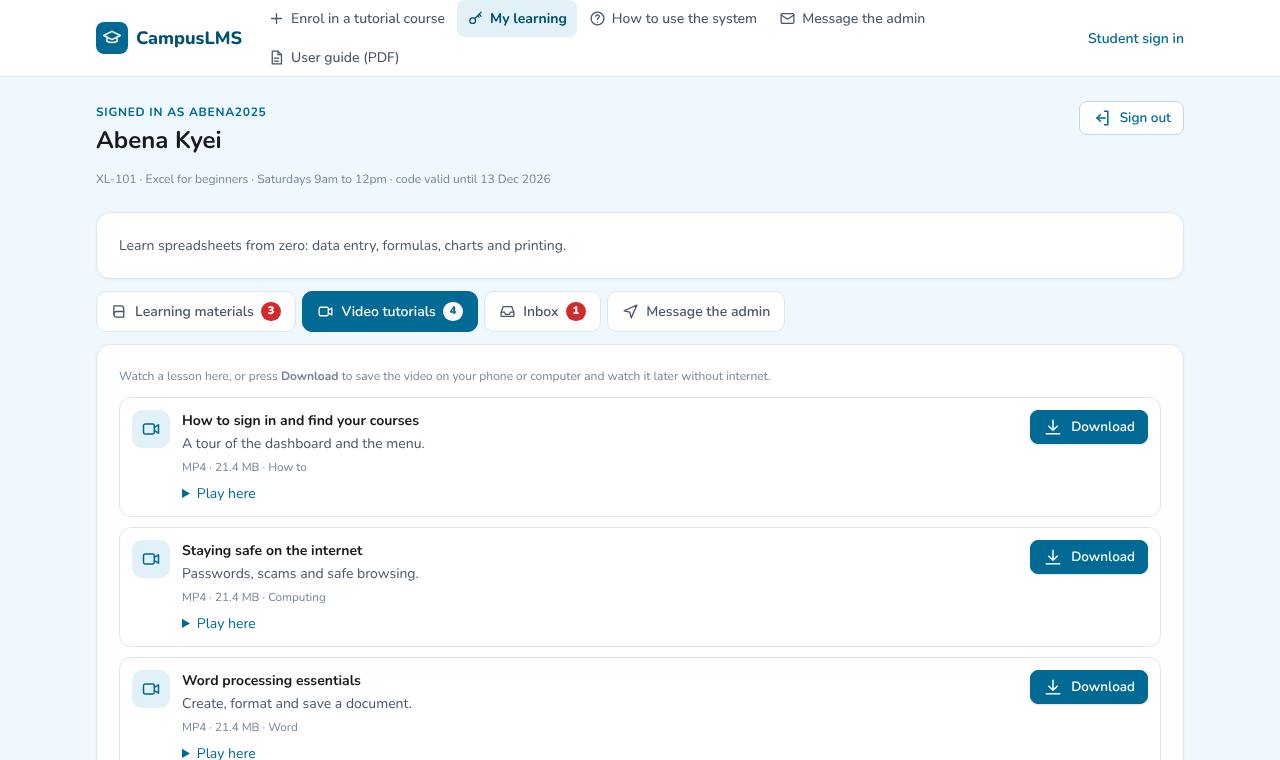
1.5 Video tutorials
The Video tutorials tab lists the school's video lessons. For each video:
- Click Play here to watch it in the page.
- Click Download to save the video file and watch it later, even without internet. The file keeps its name and the .mp4 (or similar) ending so it opens in your video player.
- If a video has notes, Notes downloads them.
1.6 Inbox and online classes
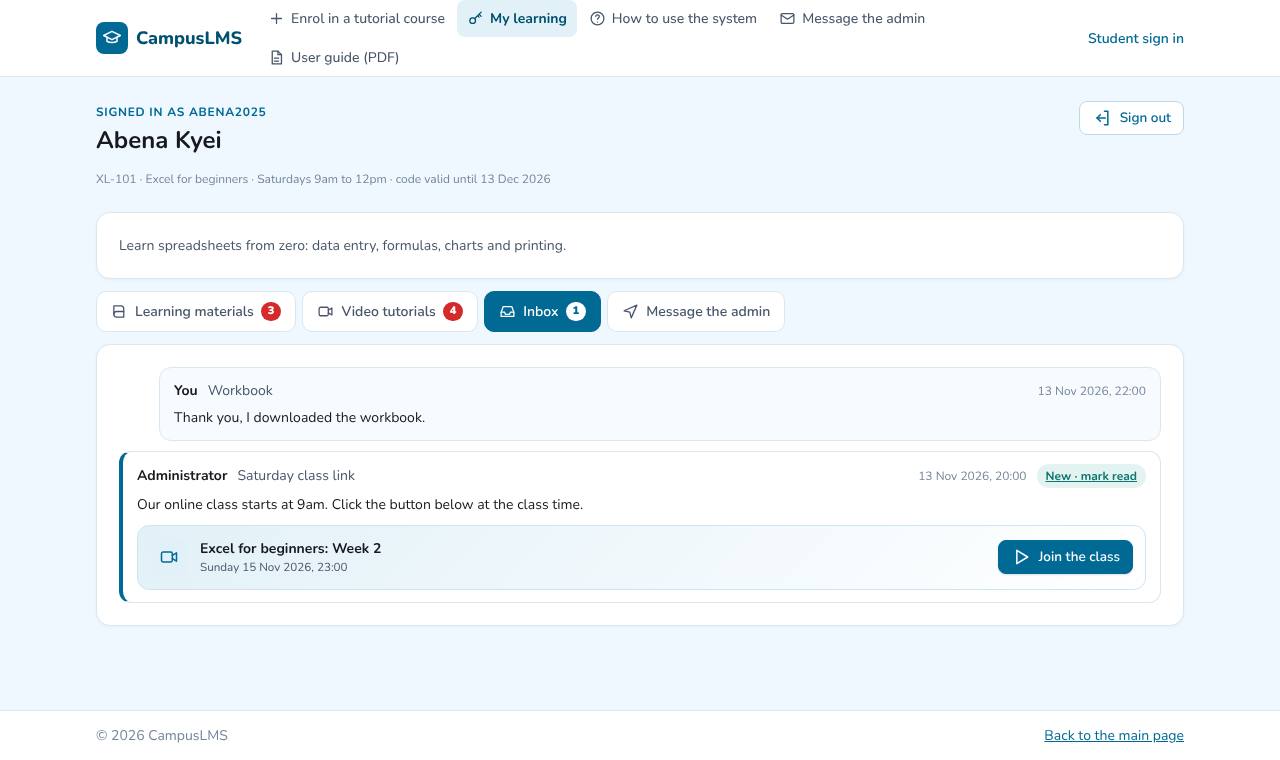
The Inbox tab shows messages from the administrator and the messages you sent. New messages are highlighted; click New · mark read once you have read one.
Joining an online class (Google Meet or Zoom)
- When a class is scheduled, a message arrives with a box showing the class name and its date and time.
- At the class time, click Join the class. The meeting opens in a new tab or in the Meet or Zoom app.
- If the app asks, allow your microphone and camera, and enter the meeting passcode if the tutor gave one.
1.7 Message the administrator
- When signed in: open the Message the admin tab, check your Contact number (required; it is filled in for you and you can correct it), type an optional subject and your message, and click Send to the administrator. The reply appears in your Inbox tab.
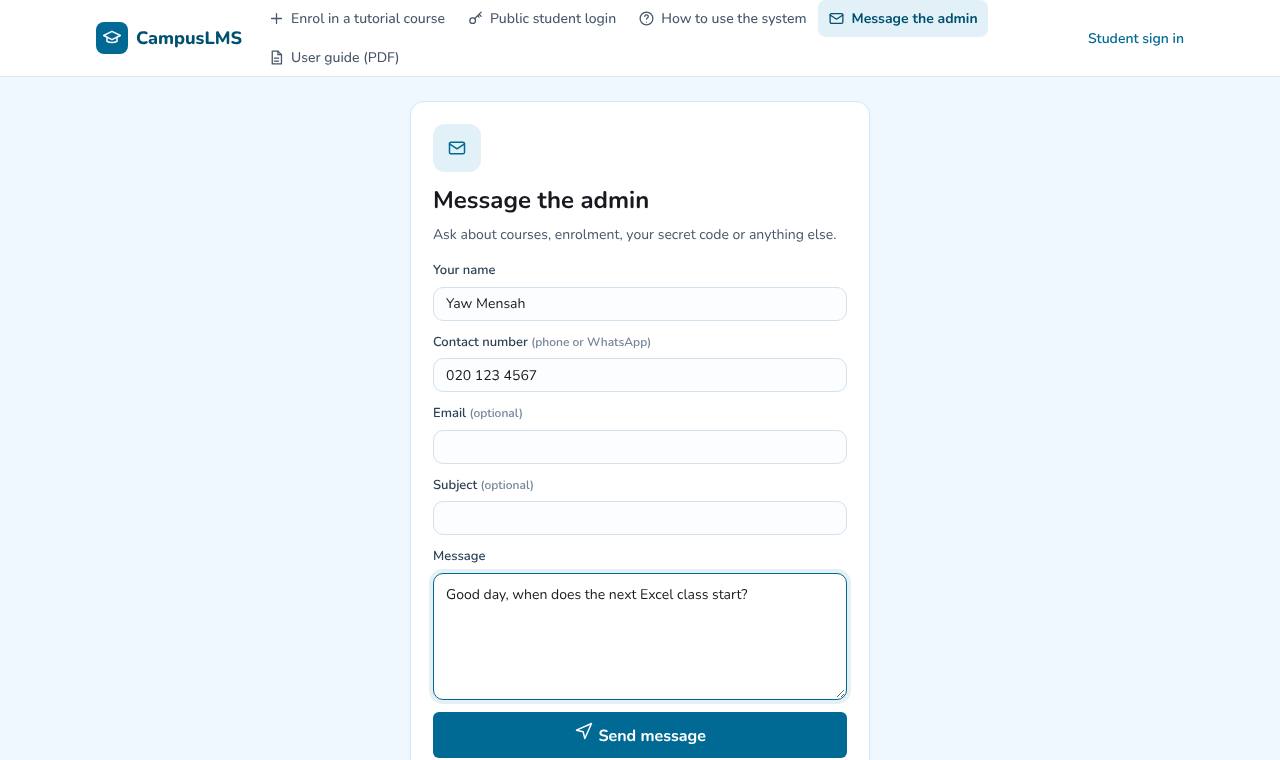
- Without signing in (anyone, for example before you enrol or when you lost your code): on the main page click Message the admin, type your name and your Contact number (required), optionally an email, and your message, then click Send message. The administrator replies by email, phone or WhatsApp.
1.8 How-to videos
How to use the system on the main page opens a page of short videos that show how to use the system. Pick a video from the list on the right to play it. Use Download video to keep it and Download guide for its written notes, when there are any. This guide is also available there as User guide (PDF).
1.9 Signing out and one device at a time
Your secret code works on one device at a time. While you are signed in on one phone or computer, the same code cannot sign in anywhere else.
- Always click Sign out (top right of My learning) when you finish, especially before using another device.
- If you forget to sign out, the system signs you out by itself after a period without activity (30 minutes unless the administrator changed it). After that you can sign in on another device.
- If you sign in on a second device after that time, the first device is signed out and shows the message You were signed out because this code was used to sign in somewhere else.
- The same phone or computer (in the same browser) can always sign in again, even if you closed the browser without signing out. You do not have to wait.
- If anything goes wrong during sign-in, you are not signed in and the page tells you what happened. Nothing is half done: simply try again.
1.10 Problems and solutions
| Message or problem | What to do |
|---|---|
| Your enrolment is waiting for the administrator. | The administrator has not approved you yet. Wait for your secret code, or send a message with Message the admin. |
| No secret code has been issued for this ID yet. | Ask the administrator to issue your code. |
| This secret code has expired. | Ask the administrator for a new code or a later expiry date. |
| This access has been turned off. | The administrator deactivated your access. Message them to find out why. |
| The code is already signed in on another device. | Sign out on the other device, or wait until it has been inactive for the idle time, then try again. If you think someone else is using your code, tell the administrator: they can sign the other device out and give you a new code. |
| You were signed out by the administrator. | The administrator ended your session (for example to free your code for another device, or for maintenance). Sign in again with your special ID and secret code. |
| Sign-in could not be completed because of a problem on the server. You were not signed in. | Wait a moment and try again. If it keeps happening, tell the administrator with Message the admin. |
| This page had been open for a long time, so the form was not sent. | The sign-in page was left open too long. It has been reloaded: type your special ID and code again. |
| Wrong special ID or code. | Check the spelling of your special ID and the code (no letter O or I in codes). After several failures wait a few minutes before trying again. |
| A download does not start or is saved as "download". | Try another browser (Chrome works well), make sure your phone has free space, and rename the file to end in .mp4 (videos) or .pdf (documents) if needed. |
| The class link does not open. | Allow pop-ups for the site, install the Google Meet or Zoom app, and click Join the class again near the start time. |
Part 2. Registered (internal) students
For students of the school who sign in with a matric number and password.
Who is a registered student?
A registered (internal) student is a student of the school with a matric number. You get the full learning system: dashboard, inbox, your courses, video tutorials, lecture notes, quizzes, assignments, the end of semester exam project, attendance and your results.
2.1 Create your account (Register)
If the administrator has not already created your account, register yourself:
- On the main page click Register.
- Fill in Student name, Matric number, Contact number (required: your phone number, for example 024 123 4567), Email (optional), Programme of study, Level and Study mode (Regular or Weekend).
- Type a Password and type it again in Confirm password.
- Click Create account. You are signed in straight away, and a message lists the courses you were enrolled in.
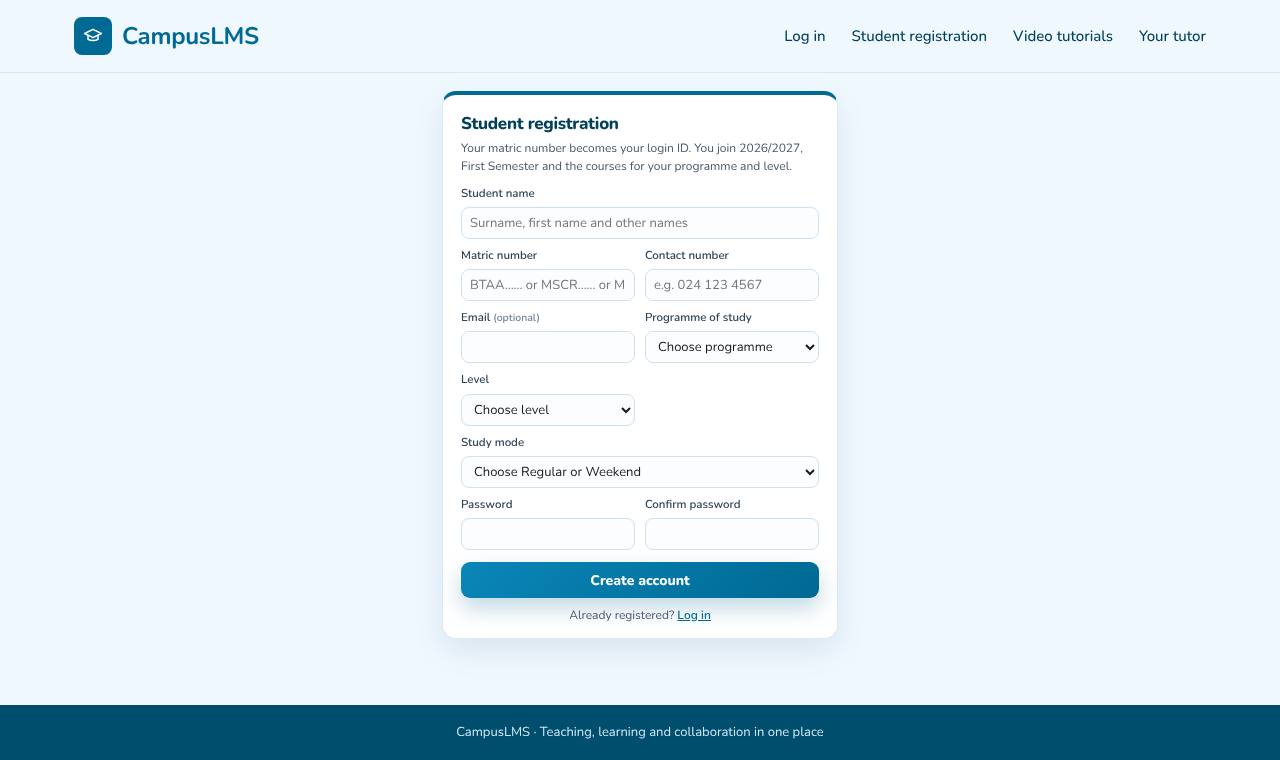
- Matric number: capital letters and numbers with no spaces (the box corrects this as you type). It must follow the school's format shown in the box, for example starting with BTAA, MSCR or MSCN. Your matric number becomes your login ID.
- You are placed in the current academic year and semester, and you are automatically enrolled in every course for your programme and level in that semester.
- If the Register button is missing, self-registration is closed: ask the administrator to create your account.
2.2 Sign in and sign out
- On the main page click Sign in. A sign-in window opens.
- Type your matric number as the user ID, and your password.
- Click Sign in. Your dashboard opens.
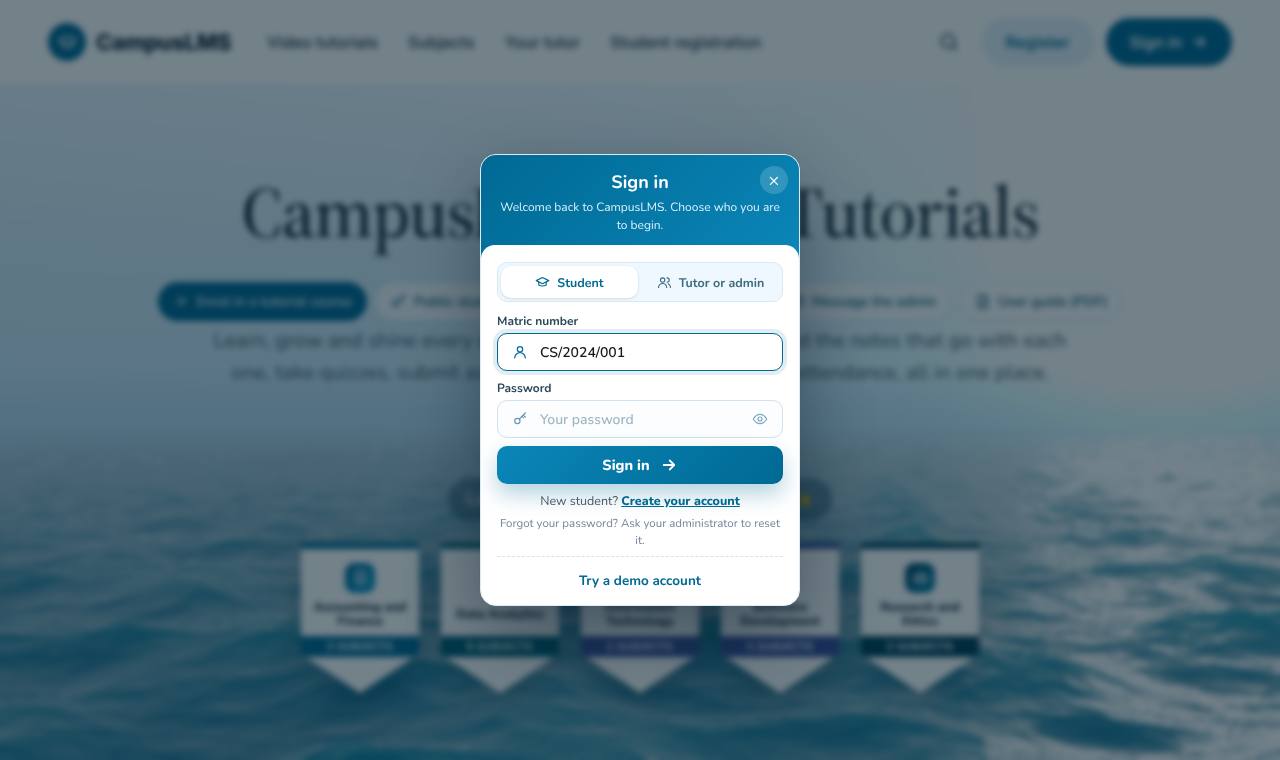
- After 5 wrong passwords for the same user ID, sign-in for that ID is paused for 15 minutes. This protects your account from people guessing passwords.
- You are signed out automatically after 4 hours without activity.
- To sign out, click Sign out at the bottom of the menu.
- Forgotten your password? Ask the administrator to reset it, then change it yourself in Profile.
- A disabled account cannot sign in. Contact the administrator.
2.3 Finding your way around
- The menu is the thin column of icons on the left. Point at an icon to see its name: Dashboard, Inbox, My Courses, Course Catalogue, Video Tutorials, Lecture Notes, My Quizzes, My Results, Attendance, Assignments and Exam Projects, and at the bottom User Guide, Profile and Sign out. On a phone, open the menu with the ☰ button.
- The ribbon at the top of the dashboard and inbox has big buttons for common tasks: New message, Take a quiz, Submit work, Mark attendance, Exam project, Lecture notes, My results, Tutorials and Join a course.
- Tables can be sorted by clicking a column heading and searched with the search box. Choose how many rows to show at the bottom.
- Filters (date, programme, level, semester and academic year) narrow long lists and reports.
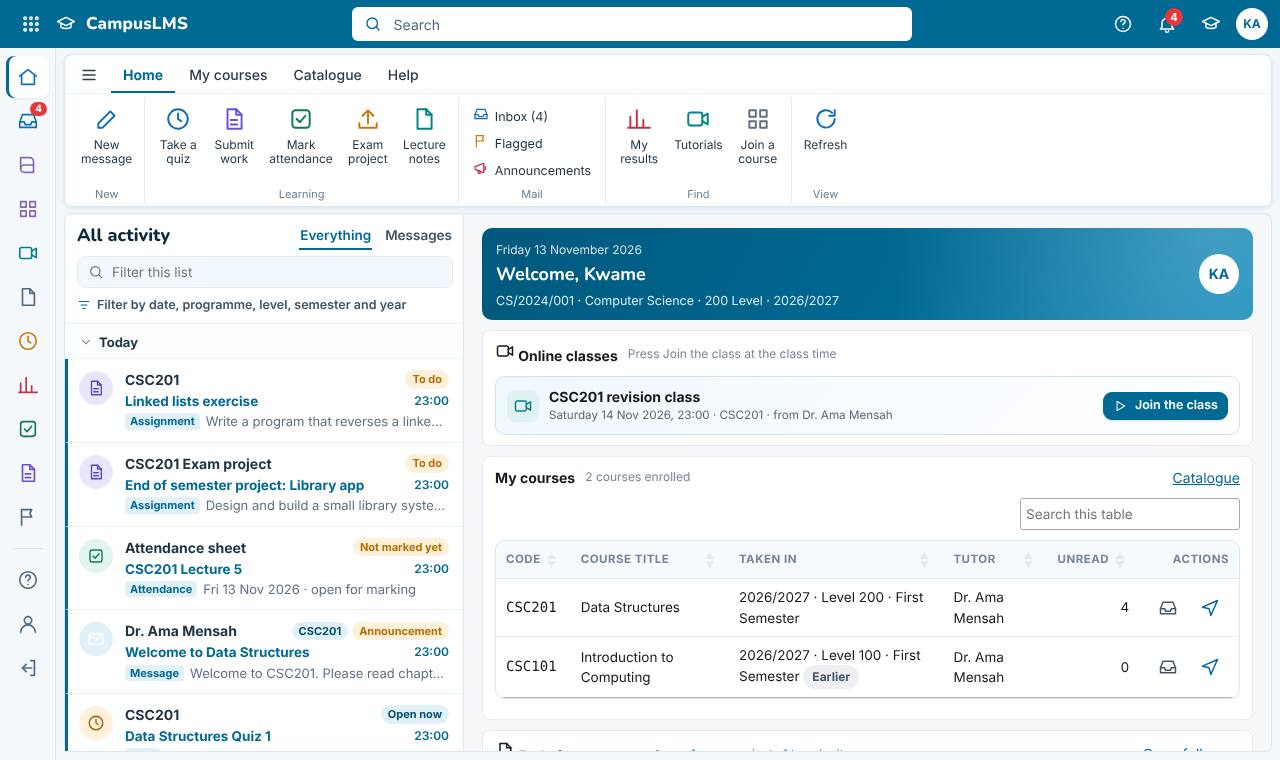
2.4 Dashboard
The dashboard is your home page. It works like an email app:
- Left pane: shortcuts to All activity, each kind of activity (messages, quizzes, assignments, attendance, tutorials, results), your Exam project and Lecture notes, and one link per course.
- Middle list: everything that happened for you, newest first, grouped by Today, Yesterday, Earlier this week and so on. Unread items are in bold. Type in Filter this list to find something.
- Right pane: with nothing selected, it shows a welcome card, My courses, your End of semester project and your Lecture notes. Click an item in the list to see its details here, with a button to act on it (open the quiz, submit the assignment, read the message, watch or download the video).
2.5 End of semester project
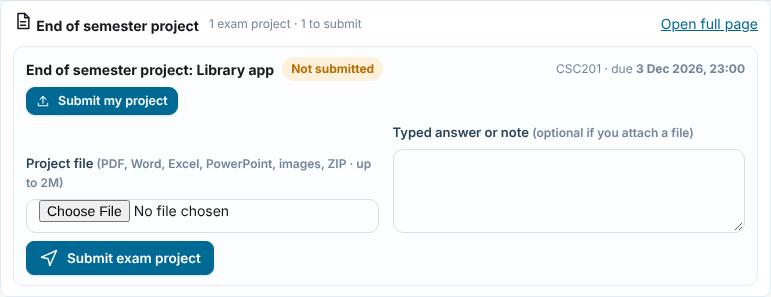
Your end of semester exam project is submitted from the dashboard, in the End of semester project box (or from the Exam Projects menu item).
- Open the Dashboard, then click Exam project in the left pane or ribbon to jump to the box.
- Find your project. It shows the course, the due date and its status (Not submitted, Submitted, Submitted late, Missed, or Received and marked).
- If there is a project document (the question or instructions), click it to download it.
- Click Submit my project if the form is not already open.
- Under Project file, choose your file (PDF, Word, Excel, PowerPoint, images or ZIP). The largest size allowed is shown next to the label.
- Optionally type an answer or a note in the text box. If you attach no file, the typed answer is required.
- Click Submit exam project. A green message confirms it, and your submission with its date appears under the project.
- You can change your submission until the due date: click Change my submission, choose a new file (or tick Remove my current file), and click Update submission.
- After the due date the form disappears, unless the tutor allows late work (it is then marked late).
- Exam project marks and feedback are not shown to students. Once your project has been marked it shows Received and marked and can no longer be changed.
2.6 Lecture notes
Your tutors upload lecture notes for your courses. You find them in two places:
- The Lecture notes box on your Dashboard (click Lecture notes in the left pane or ribbon to jump to it).
- The Lecture Notes menu item, a full page with the same list.
- Use the course buttons above the table (All courses, then one button per course with the number of notes) to show one course.
- Click Download to save a note, or Open to read a PDF in the browser.
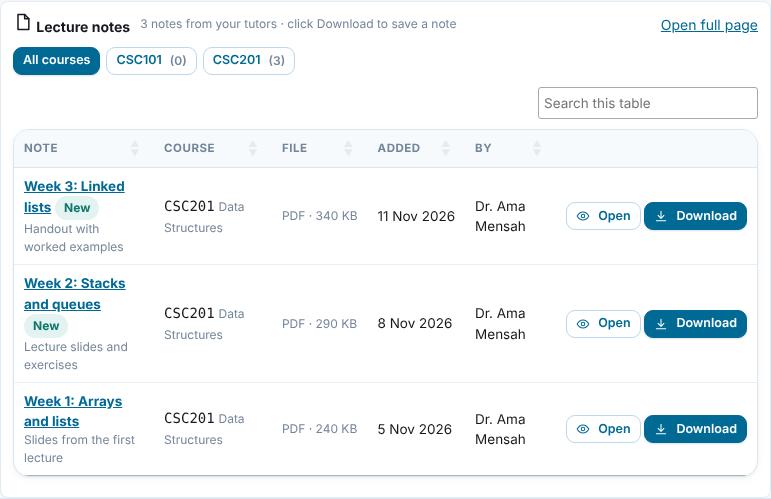
Notes added in the last 7 days are tagged New. You only see notes for courses you are enrolled on, including courses from earlier years.
2.7 Inbox, messages and online classes
The Inbox holds messages and announcements from your tutors and the administrator.
- Folders on the left: Inbox, Unread, Starred, Announcements, Sent items, Archive and My results, plus one folder per course.
- Click a message to read it in the reading pane. Reply in the box underneath and click send.
- New message writes to the tutor of one of your enrolled courses: choose the course, type a subject and the message, and send.
- Use the ribbon buttons to Flag (star) important messages, Archive old ones, mark as read or unread, or print.
- With no message open, the inbox also shows Quizzes for you and Video tutorials for you, each with buttons to start or watch, and to download videos.
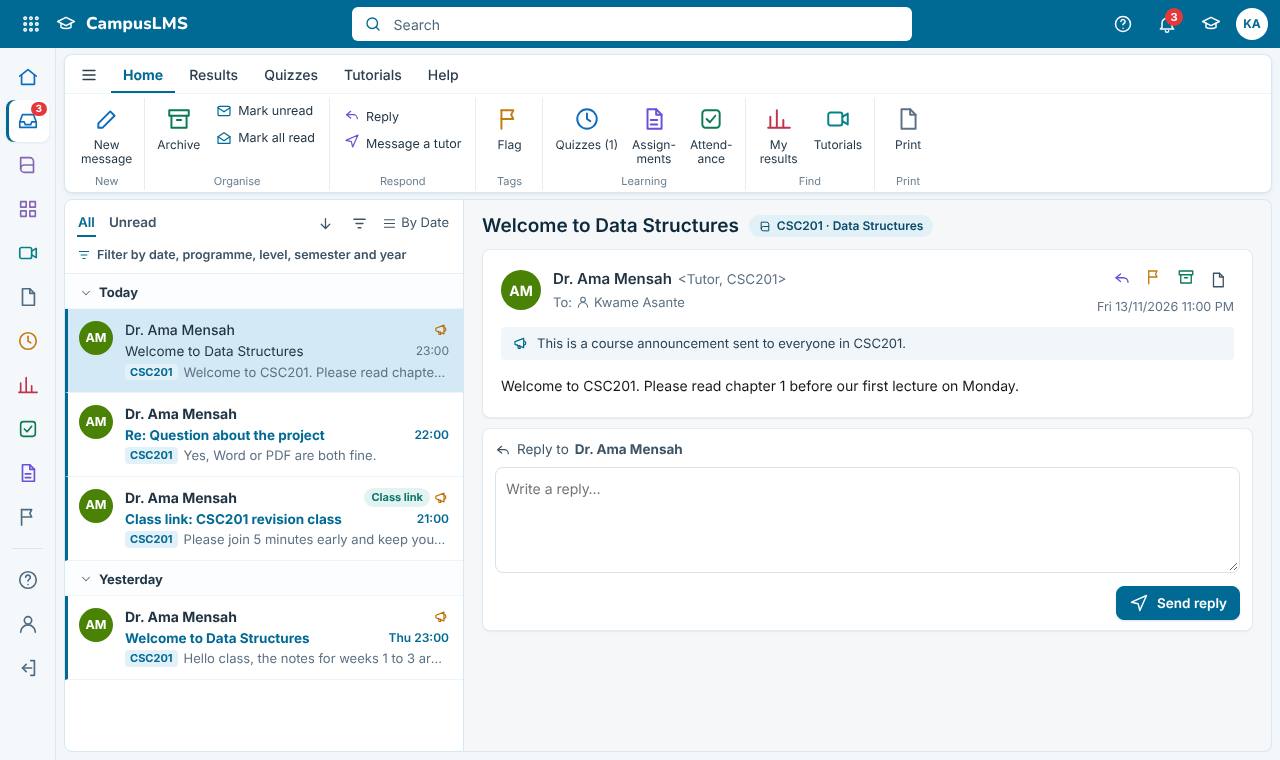
Online classes. When a tutor or the administrator holds a class on Google Meet, Zoom or Microsoft Teams, you receive a message marked Class link. It shows the class title and time and a Join the class button. The same class also appears in the Online classes box at the top of your Dashboard until about three hours after it starts.
- A few minutes before the class time, open your Dashboard (or the message in your Inbox).
- Click Join the class. The meeting opens in a new tab, or in the Google Meet, Zoom or Teams app if you have it.
- Type your real name if you are asked, and wait to be admitted.
2.8 My courses and the Course Catalogue
- My Courses lists every course you are enrolled on, with its tutor, and links to its messages and lecture notes. Courses from an earlier year or level are marked Earlier.
- Course Catalogue lists the courses for your programme and level that you can join. Click the join button to enrol.
2.9 Video tutorials and downloads
- Open Video Tutorials. Filter by category or search by title.
- Click Watch on a card to open the watch page and play the video. Its description and notes are underneath.
- Click Download on the card, or Download video on the watch page, to save the video and watch it offline later.
- Click the document link to download the notes that go with the video; PDF notes can also be opened in the browser.
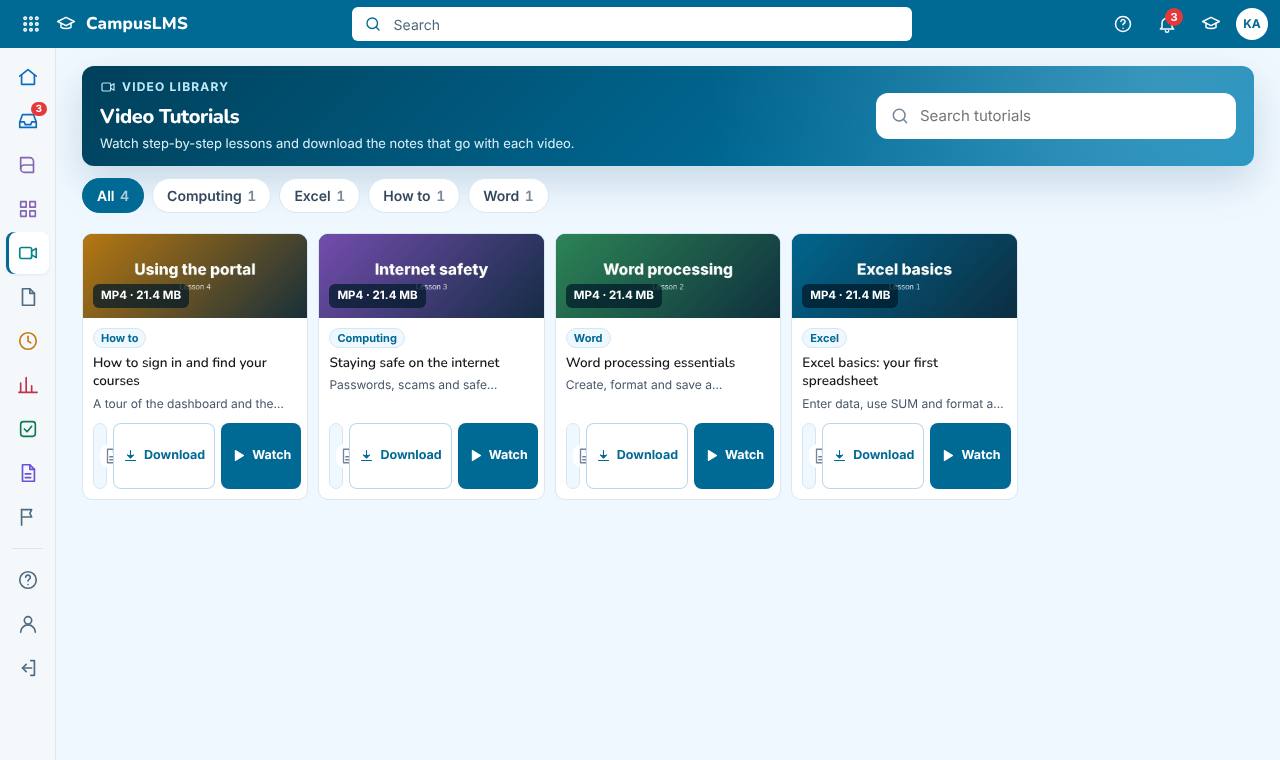
Video downloads are also available from the dashboard (open a tutorial in the activity list and click Download video), the inbox's Video tutorials for you box, and the main page for lessons shown there.
2.10 Quizzes
Quizzes appear under My Quizzes, in the inbox and on the dashboard. Each quiz card shows the course, when it opens and closes, the time allowed, the number of questions you will get and the attempts you have left.
Taking a quiz
- Click Start on an open quiz and confirm. Starting uses one attempt and the countdown timer begins.
- Answer each question by choosing an option. Every answer is saved as soon as you pick it. Move between questions with the navigation buttons or the question numbers in the side panel.
- Click Review answers to see all questions with your answers, filter to unanswered ones, and use Change to go back to a question.
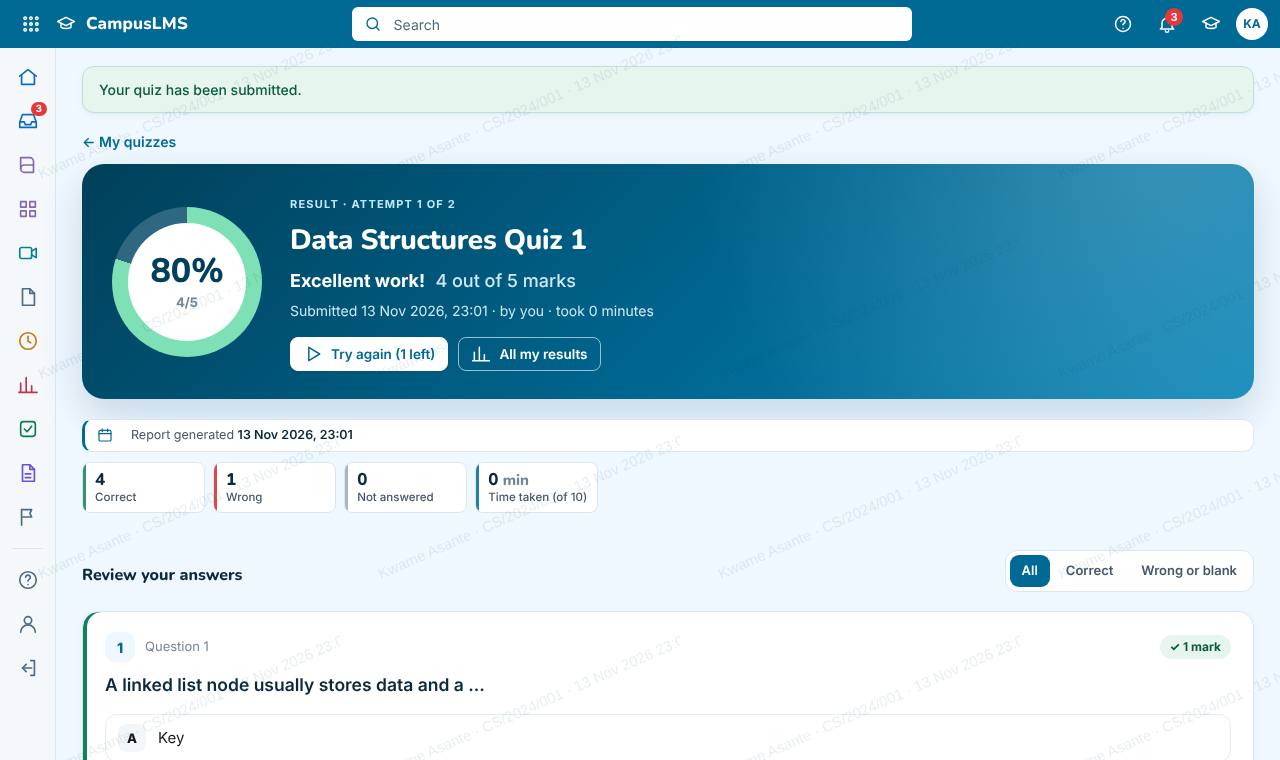
- Click Submit quiz when you are done. Your score appears straight away, with your answers.
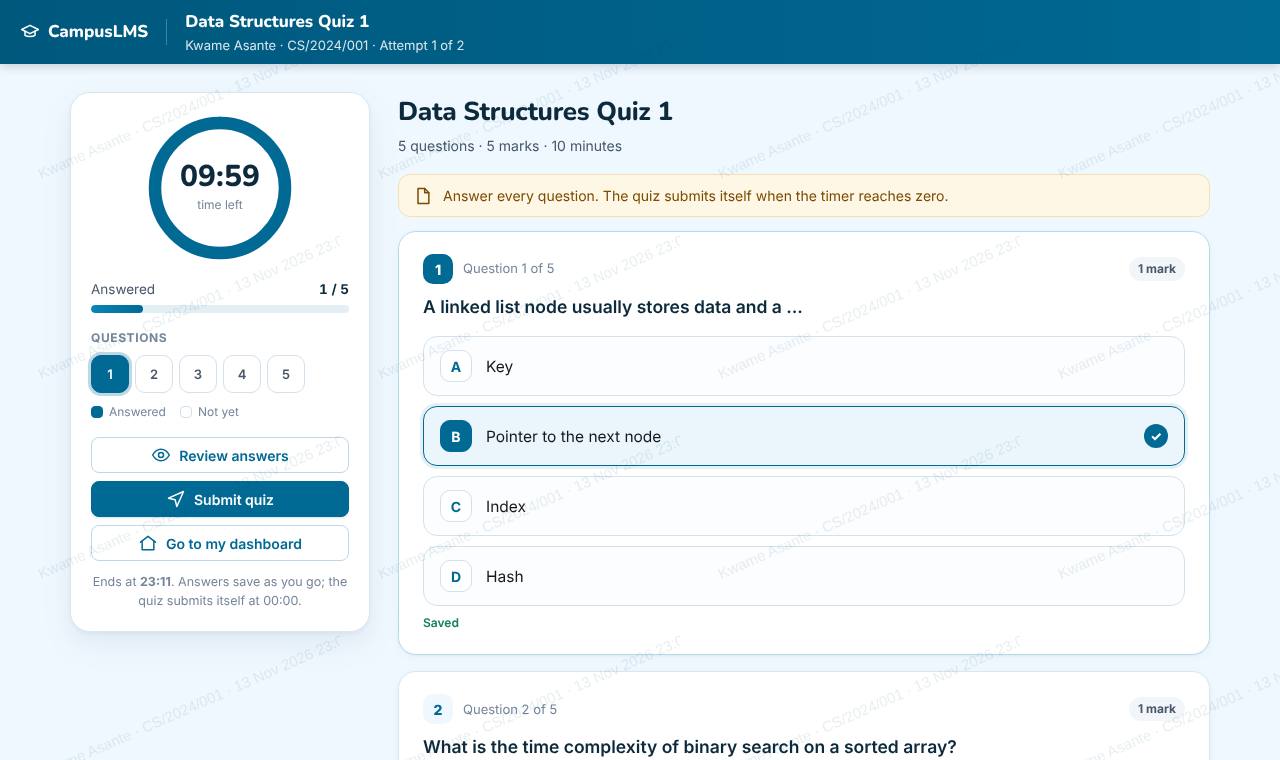
Rules to know
- The timer keeps running even if you leave the page. Go to my dashboard leaves the quiz with your answers saved; come back with Resume quiz before the time runs out.
- When the time runs out or the quiz closing time passes, the quiz is submitted automatically with the answers saved so far.
- Each attempt gets questions picked at random from the question bank, in random order, so classmates may get different questions.
- Quiz pages are protected: copying, right-click and printing are blocked, the questions are hidden when the window loses focus or a screenshot key is pressed, and a watermark shows your name and matric number. Stay on the quiz page until you submit.
- If you have several attempts, your best attempt counts in your results.
2.11 Assignments
- Open Assignments (or click Submit work on the ribbon).
- Click Submit next to an assignment. Its details open at the top: instructions, due date, marks, and the assignment document if there is one.
- Choose Your file and/or type your answer in Typed answer.
- Click Submit assignment.
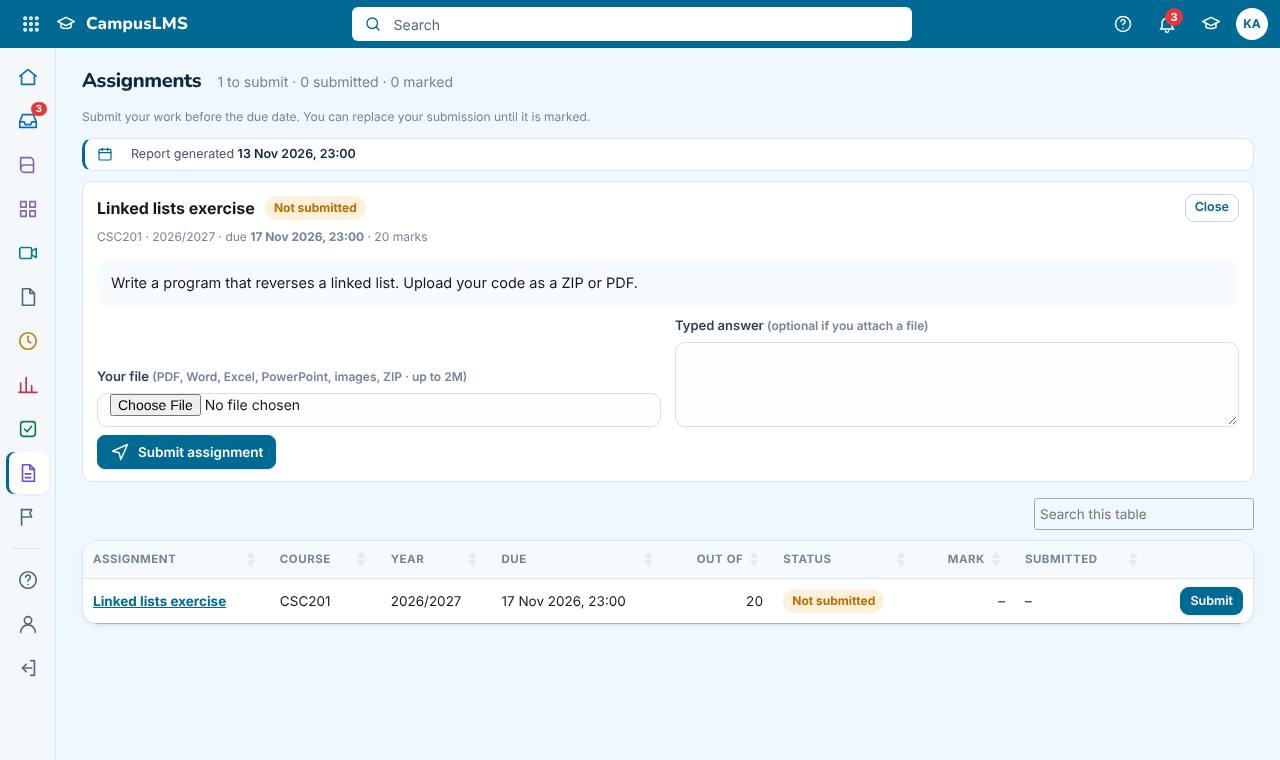
- You can replace your submission with Change until it is marked or the due date passes. Late work is only accepted when the tutor allows it and is labelled Submitted late.
- When the tutor marks it, the mark and any feedback appear in the list and in My Results.
2.12 Attendance
- In class, the tutor opens an attendance sheet and tells you the range of numbers to use, or gives each student a number.
- Open Attendance (or Mark attendance on the ribbon).
- On the open sheet, type Your unique number and submit.
- Your entry shows as Waiting until the tutor approves it. Approved entries count as present.
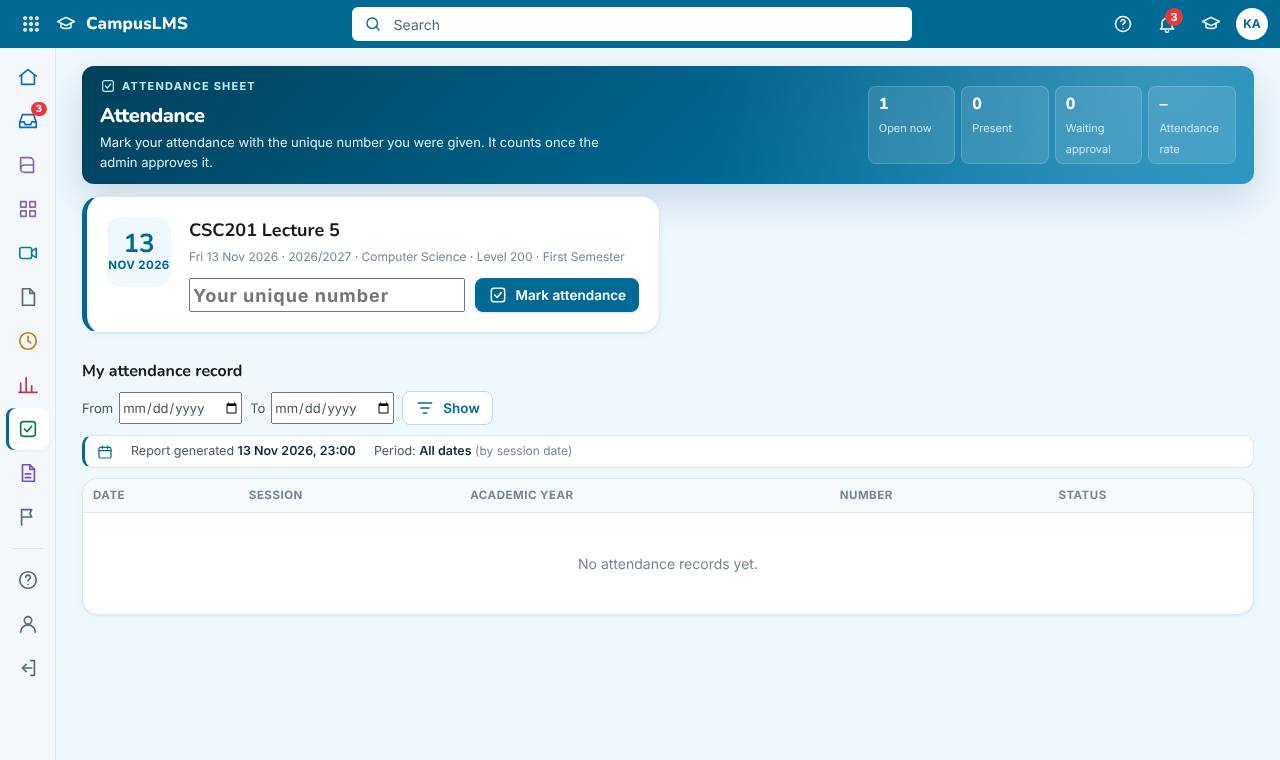
- A number outside the range, or one already used by another student on the same sheet, is refused (you are told who used it). Report problems to your tutor.
- My attendance record lists every sheet with your status, and the percentage of classes attended.
2.13 My results
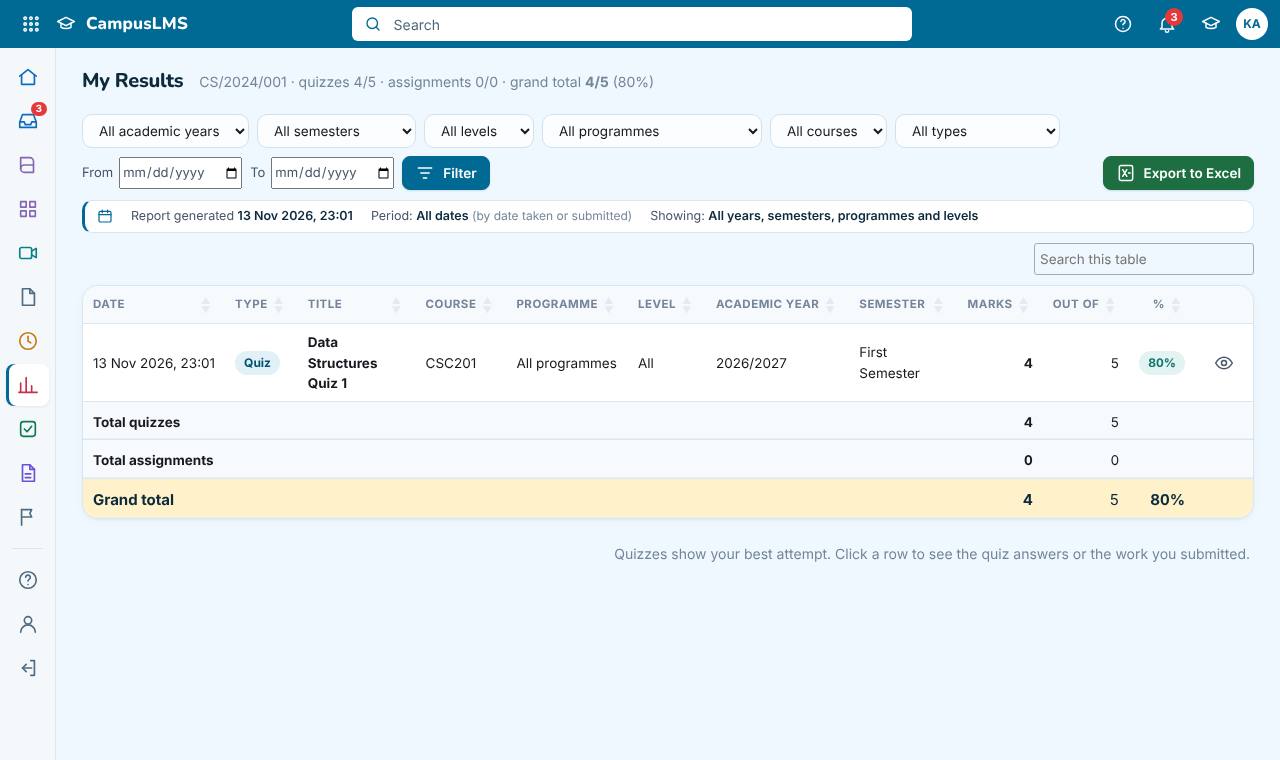
My Results shows your quiz marks (best attempt), assignment marks and class participation marks, with totals and a grand total. Filter by academic year, level, programme, course, type or dates, and click the Excel button to download a copy. Exam project marks are kept for staff and are not shown.
2.14 Profile and password
- Click Profile at the bottom of the menu to see your details.
- To add or change your Contact number, type it in the box under your details and click Save number (or Update number). Please keep it up to date so your tutors and the administrator can reach you.
- To change your password, type your Current password and a New password, then save.
Your name, matric number, programme, level and semester can only be changed by the administrator.
2.15 Problems and solutions
| Problem | What to do |
|---|---|
| Sign-in is paused for a number of minutes. | Too many wrong passwords. Wait for the time shown, then try again carefully, or ask the administrator to reset your password. |
| A quiz, assignment or attendance sheet my classmates see is missing for me. | Your programme, level, semester or study mode may be wrong. Check them in Profile and ask the administrator to correct them. |
| I cannot start a quiz. | It may not be open yet, it may have closed, or you used all attempts. The quiz card says which. |
| My file will not upload. | Check the file type and size shown next to the upload box. Compress large files into a ZIP or a smaller PDF. Upload on a steady connection. |
| I cannot find the exam project form. | The due date may have passed, or the project is already marked. Contact your tutor. |
| A video will not download. | YouTube lessons cannot be downloaded. For others, try another browser, free some space, keep the page open until the download finishes, and try again (downloads can resume). |
| Join the class does not open the meeting. | Allow pop-ups for this site, install the Google Meet or Zoom app on your phone, and try again near the class time. If the message says the link is no longer available, the class was cancelled. |
| I was signed out. | This happens after 4 hours without activity, when the administrator signs you out (the message says so), or when the administrator disables an account. Sign in again; your work and answers that were saved are kept. |
Part 3. Tutors
For tutors and lecturers who run courses, set work and give marks.
What tutors can do
As a tutor you manage your own courses and the students enrolled on them: you create courses, enrol students, upload lecture notes, set quizzes, assignments, exam projects and class participation marks, run attendance, mark work, read reports and message your students. You see only your own courses and their students. Accounts, settings, the menu, the login page and the video tutorial library are managed by the administrator.
3.1 Sign in and the dashboard
- On the main page click Sign in, then type the user ID and password the administrator gave you.
- Change your password straight away in Profile.
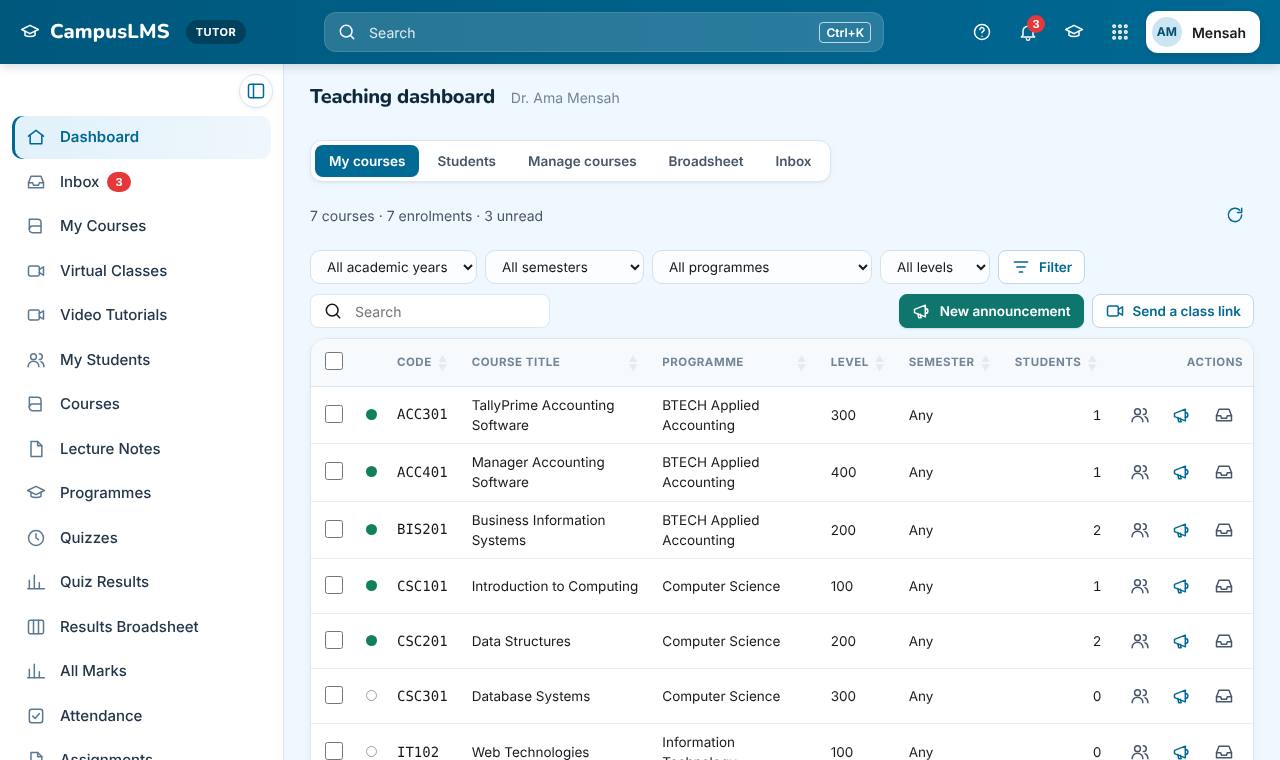
Your dashboard lists your courses with their programme and number of students, filters for programme, level, semester and academic year, and the newest video tutorials. The same sign-in rules apply as for students: 5 wrong passwords pause sign-in for 15 minutes, and you are signed out after 4 hours without activity.
3.2 Courses and students
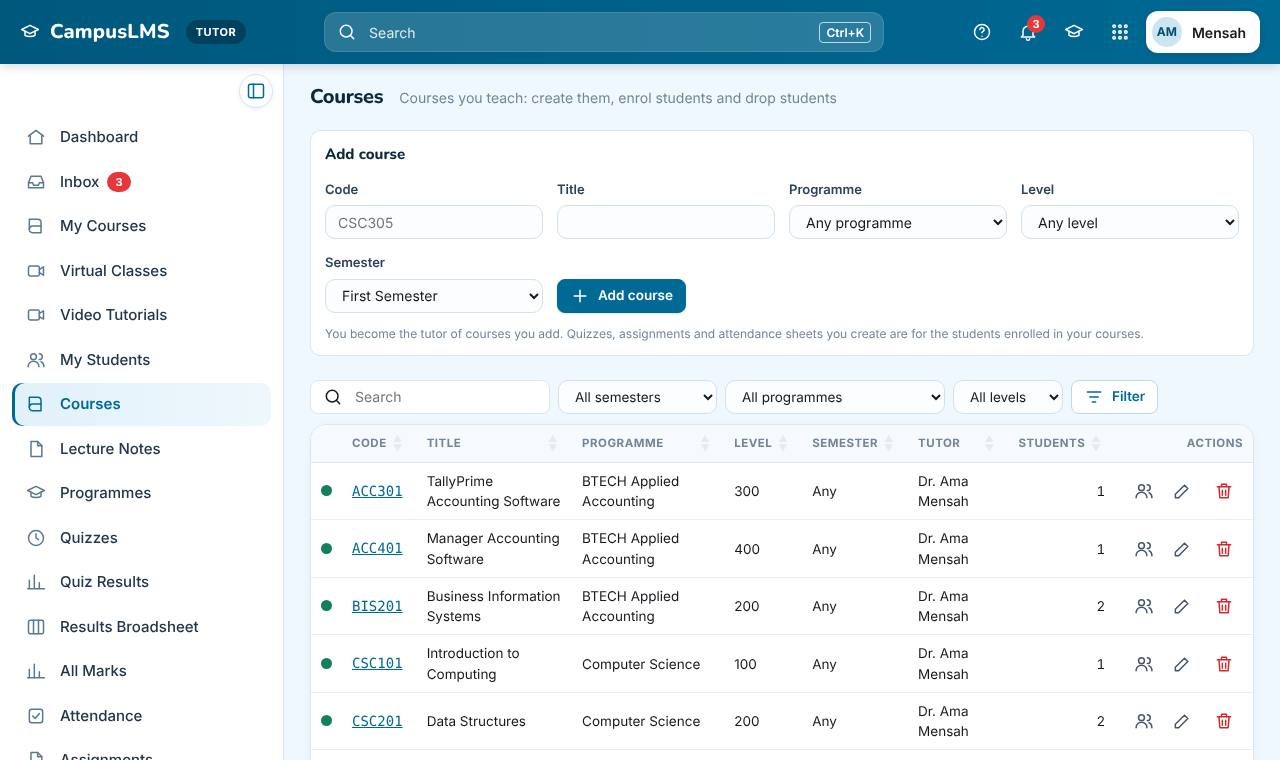
Create a course
- Open Courses.
- Fill in the Code (for example CSC201), Title, Programme, Level and Semester.
- Save. You become the tutor of the course. Use the edit button on a row to change a course later.
Enrol and remove students
- On Courses, open a course.
- Type one or more Matric numbers (one per line or separated by commas), or tick students under Or pick students, and enrol them.
- To remove a student from the course, use the remove button on their row and confirm. Their account stays active; they only leave this course.
My Students lists every student enrolled on your courses, with their matric number, programme and level, and can be searched and filtered.
3.3 Programmes
Programmes lists the programmes of study used for courses, registration and filters. You can add a programme, and rename or delete the programmes you added.
3.4 Inbox and announcements
- The tutor inbox has folders, one folder per course, and the matric number of the sender on every row.
- New message writes to one student. Announcement sends a message to every student of a course at once.
- Tick several messages to mark them read or unread, star, or archive them together.
- Reply from the reading pane. Students can only message the tutors of their own courses.
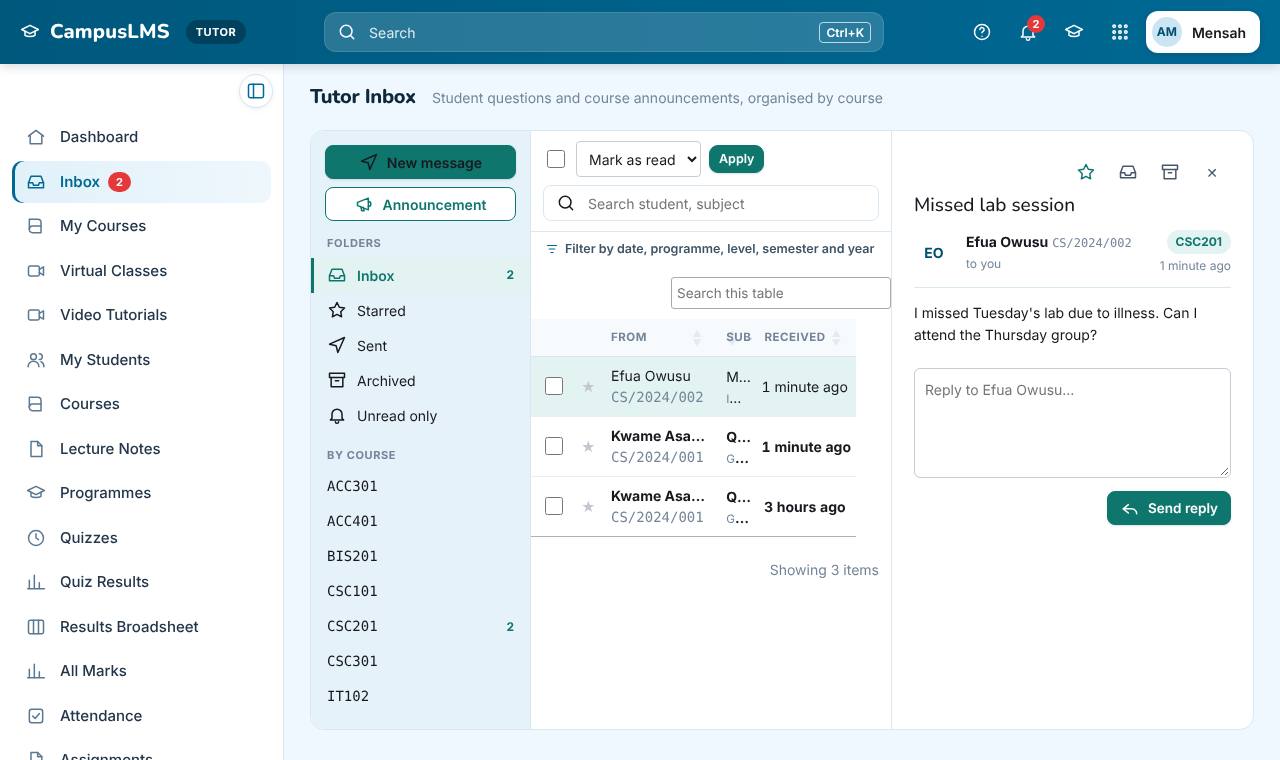
When you write a New message or an Announcement you can open Add a Google Meet or Zoom link (optional) and paste a meeting link. The students then get a Join the class button in that message.
3.4a Online classes (Virtual Classes)
Use Virtual Classes in the menu (or Send a class link on your dashboard) to send a Google Meet, Zoom or Teams link to every student of one of your courses at once.
- Create the meeting in Google Meet, Zoom or Teams as usual and copy its link (it starts with https://).
- Open Virtual Classes. Type a Class title, for example "CSC201 revision class", and paste the Meeting link.
- Choose the Date and time (optional but recommended) and the course under Send to students of.
- Add a short message if you like, then click Send class link.
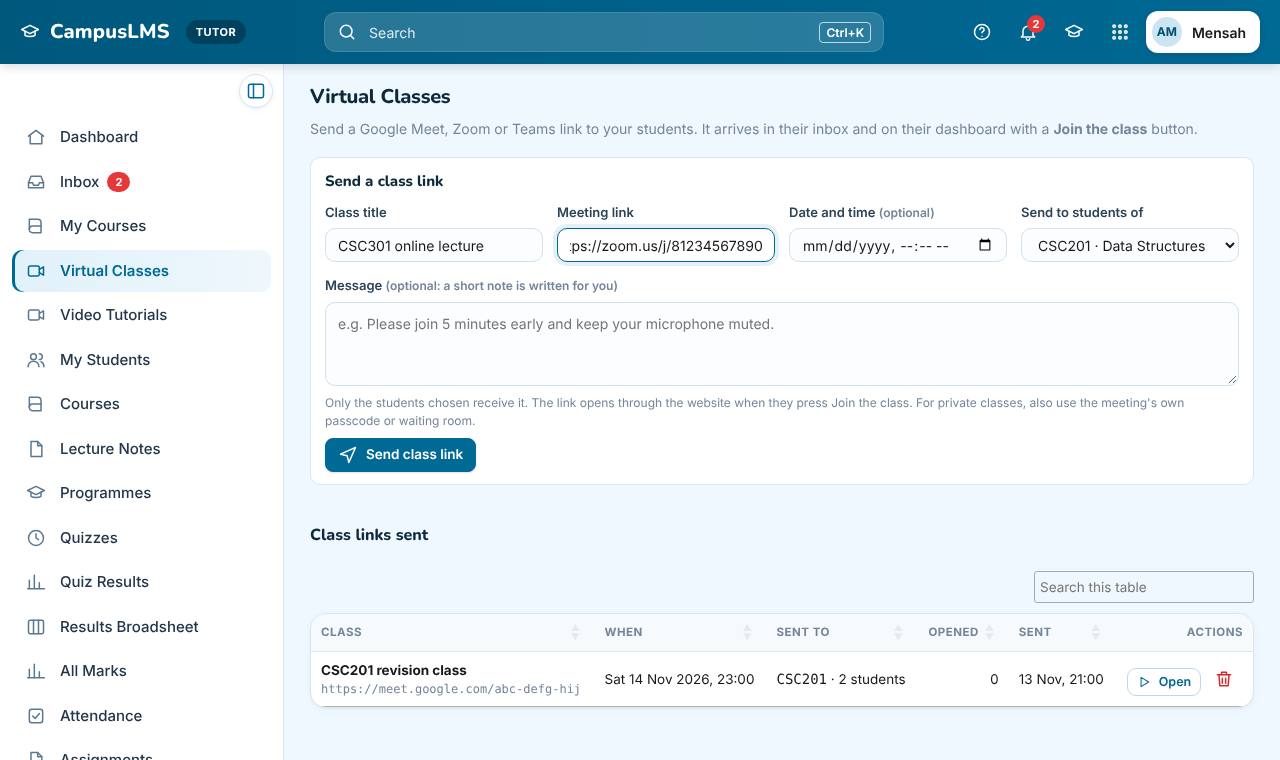
- Every active student of the course receives it in the Inbox and in the Online classes box on their Dashboard, with a Join the class button.
- The table Class links sent lists your classes, how many students received each one and how many have Opened it.
- To cancel a class, click the bin button on its row. The link is removed from every student's inbox.
- For private classes also turn on the meeting's own passcode or waiting room.
3.5 Lecture notes
- Open Lecture Notes.
- Choose the Course, type an optional Title and Description, and choose the file (PDF, Word, PowerPoint, Excel, ZIP, images and other document types).
- Click Upload note. Large files are sent in small pieces with a progress bar, so the hosting upload limit does not block them. Keep the page open until it finishes.
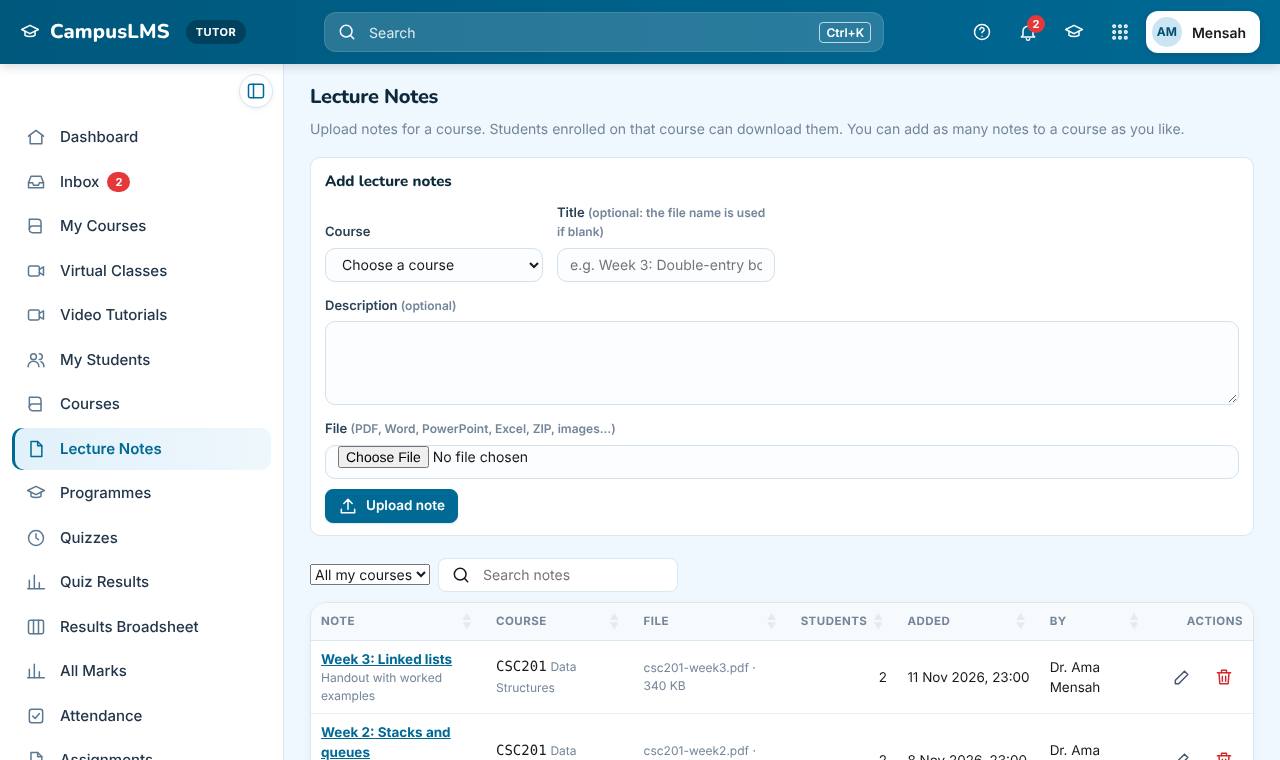
- Add as many notes per course as you like. Edit a note to rename it, change its description or replace its file, or delete it.
- Students enrolled on the course see the note at once on their dashboard and Lecture Notes page, tagged New for 7 days.
3.6 Quizzes and questions
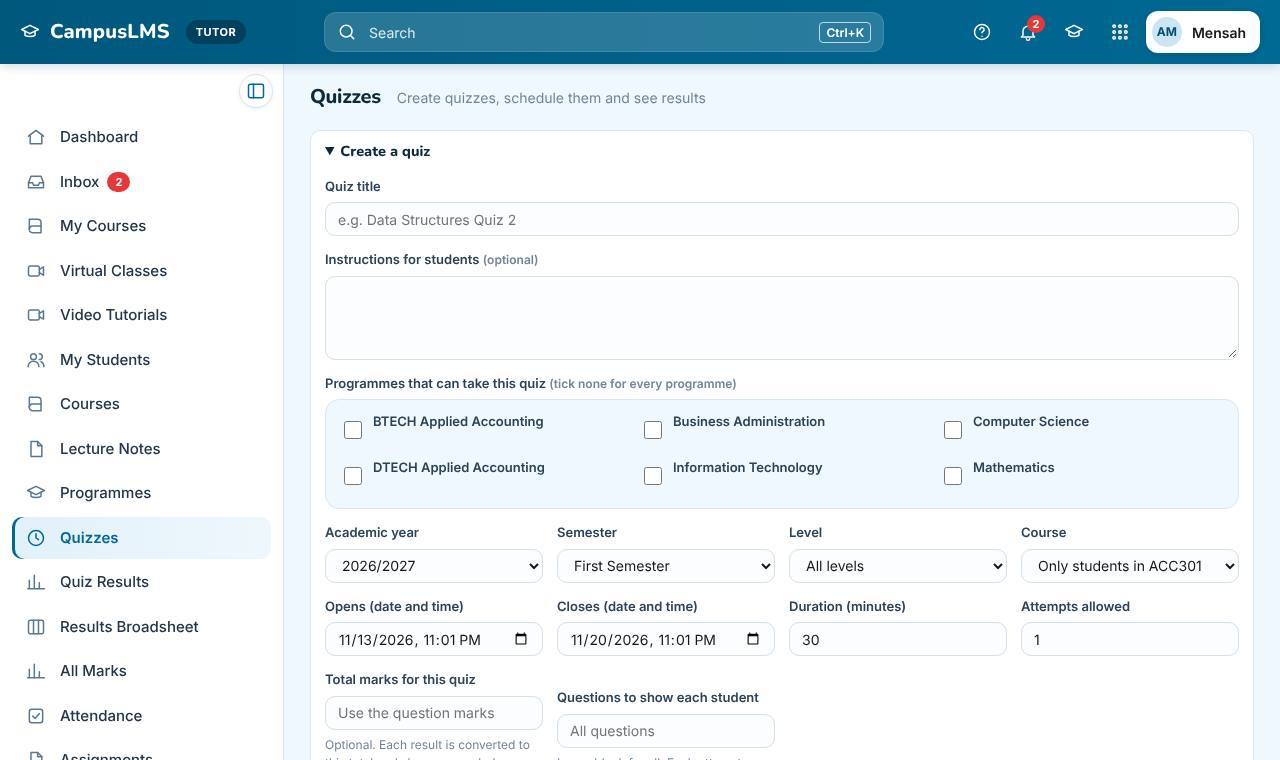
Create a quiz
- Open Quizzes and fill in the form:
- Quiz title and Instructions for students.
- Programmes that can take this quiz, the Level, and optionally one Course. Only matching students see it.
- Academic year and Semester.
- Opens and Closes (date and time). After the closing time nobody can start or continue.
- Duration (minutes) and Attempts allowed.
- Questions to show each student: how many questions each attempt draws at random from the question bank (blank gives all questions, in random order).
- Total marks for this quiz (optional): results are converted to this total, for example 7 out of 9 on a quiz worth 20 gives 16.
- Save. The quiz opens on its Questions tab.
Add questions
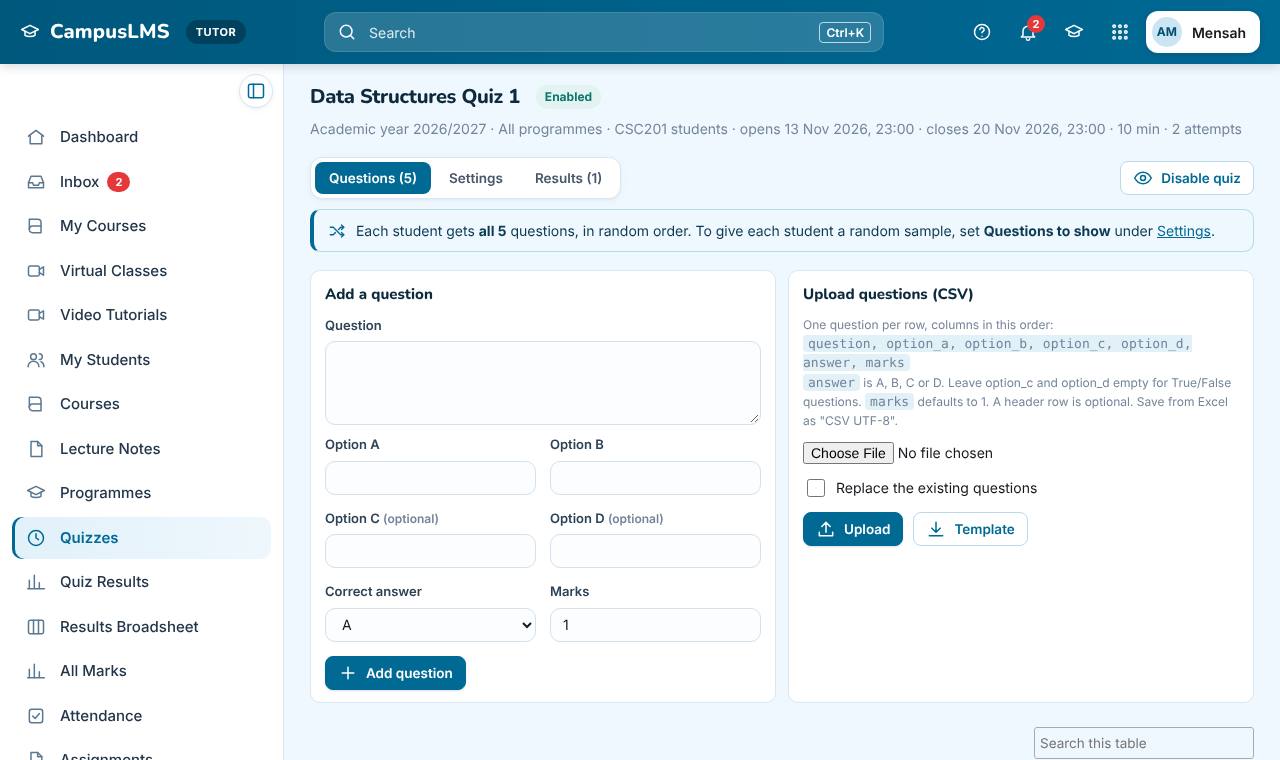
- One by one: type the Question, options A to D, choose the Correct answer and the Marks, and add. For True/False questions fill only options A and B.
- From a CSV file: click Template to download the layout, fill it in Excel, save as CSV UTF-8, and upload it with Upload questions. Columns: question, option_a, option_b, option_c, option_d, answer (A, B, C or D), marks.
- Edit or delete any question later.
Run the quiz
- Use Enable quiz or Disable quiz at the top of the quiz page. Enabled quizzes appear in the students' inbox, dashboard and My Quizzes once their opening time arrives.
- Reset clears attempts for one student (for example after a power cut) or for everyone.
- The quiz's Results tab lists every attempt; export it to Excel.
3.7 Quiz results
Quiz Results lists every submitted attempt across your quizzes. Filter by quiz, programme, level, study mode, academic year, pass or fail, student or dates; show the best attempt only; and export to Excel. Each result shows the raw score and the converted mark when the quiz has a total.
3.8 Attendance sheets
- Open Attendance and fill in a new sheet: Title, Date, Academic year, Semester, Programme, Level and Course.
- Enter the Total students eligible. The form shows how many registered students match, to help you.
- Set the range of numbers, Unique numbers from and to (for example 1 to 100). The range must be at least as large as the number of eligible students.
- Save and tell the class to mark attendance with their number.
- Open the sheet to see the entries. Tick entries and click Approve or Reject. You can also tick students and click Mark present for those who could not enter a number.
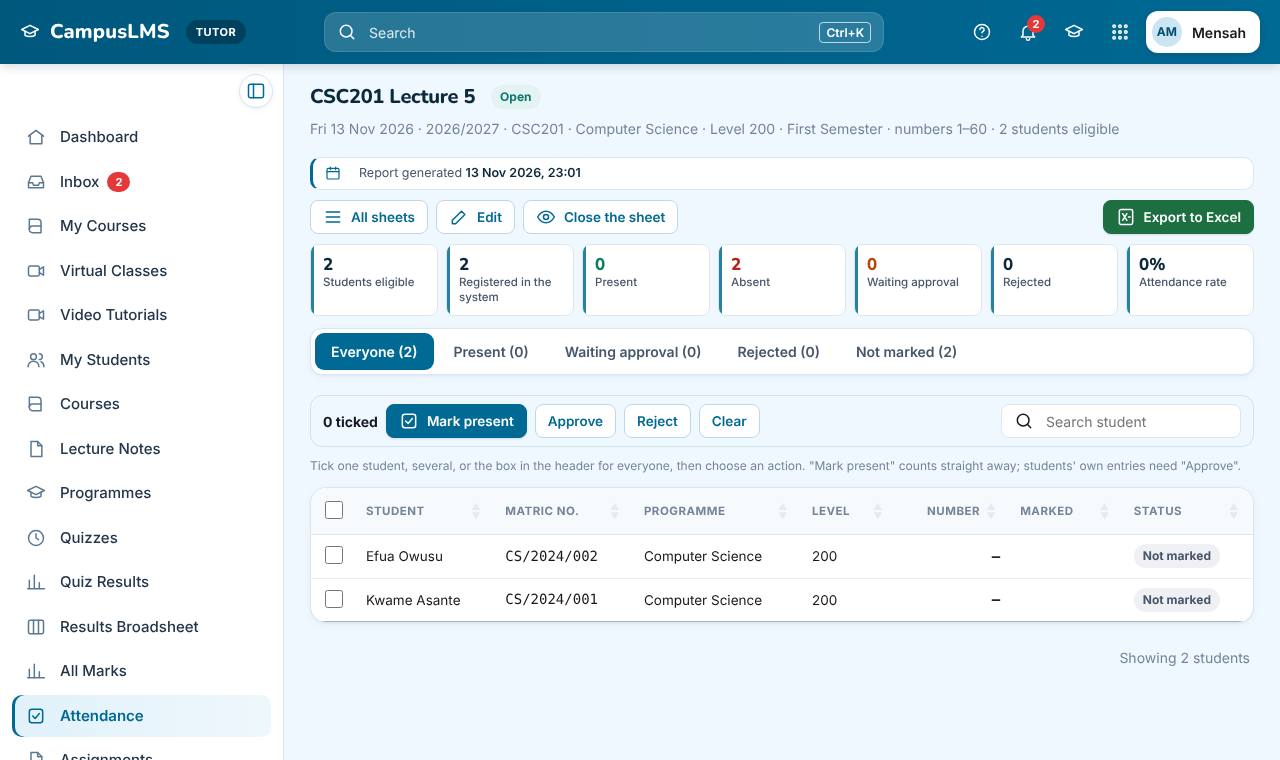
The tabs By attendance sheet and By student show statistics (eligible, present, absent, waiting, rejected and the attendance rate), with filters and Excel exports. Click Close the sheet when the class ends so no more numbers can be entered.
3.9 Assignments and marking
- Open Assignments and fill in Title, Instructions, Academic year, Semester, Programme, Level and/or Course, Due (date and time) and Maximum marks. Attach a document if needed, and choose whether late work is allowed.
- Save. Students see it at once.
- To mark, open the assignment. Every eligible student is listed with their submission (download the file or read the typed answer).
- Type each mark (and feedback) and click Save / update marks. To give the same mark to many students, tick them, type the mark and click Give to ticked.
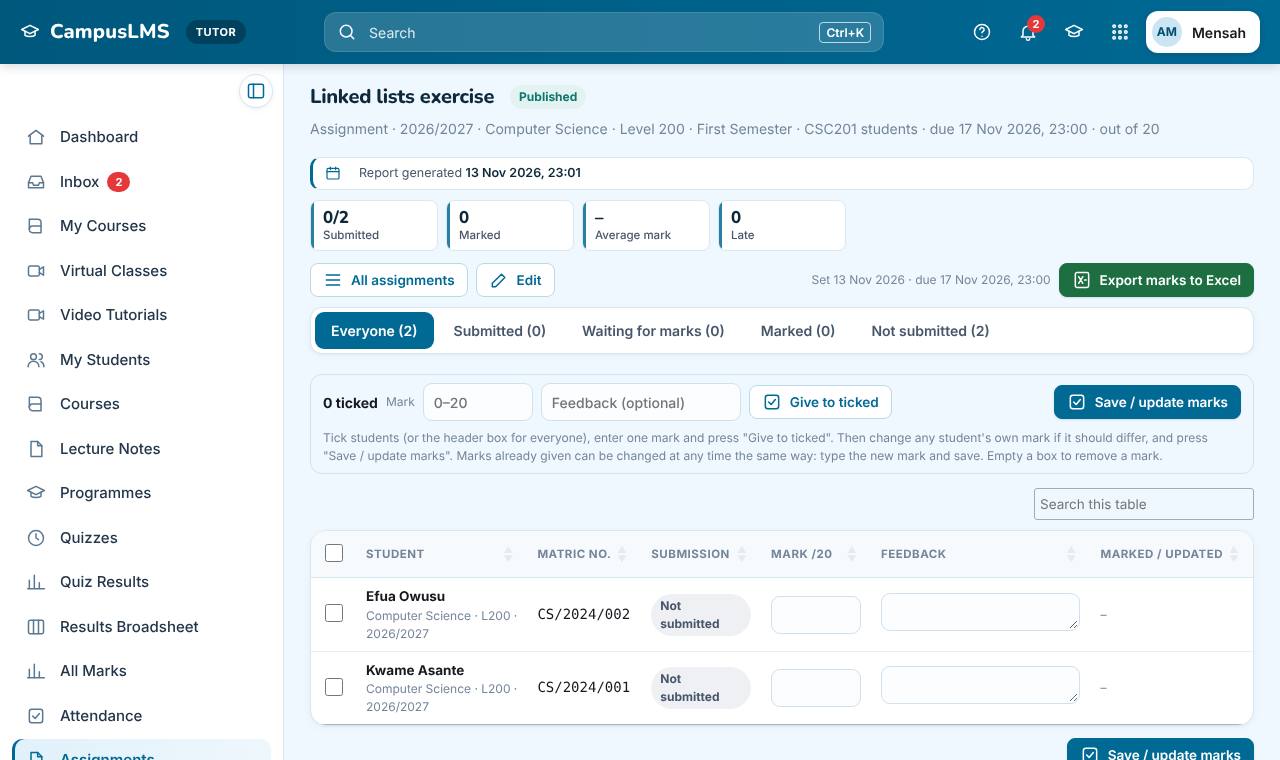
Marks can be changed at any time: type the new mark and save, or empty the box to remove a mark. Students see marks straight away. Export marks to Excel from the assignment page.
3.10 Exam projects
Exam Projects work like assignments, for the end of semester exam project. Set the project with a due date, maximum marks and an optional document. Students submit it from their dashboard or the Exam Projects page. Mark it the same way as an assignment.
3.11 Class participation
- Open Class Participation and create a participation sheet for a course, academic year, semester, programme or level, with a maximum mark.
- Give marks to one student, to ticked students, or to everyone, and change them at any time.
There is nothing for students to submit. The marks appear in My Results for students and on the Broadsheet.
3.12 Results Broadsheet and All Marks
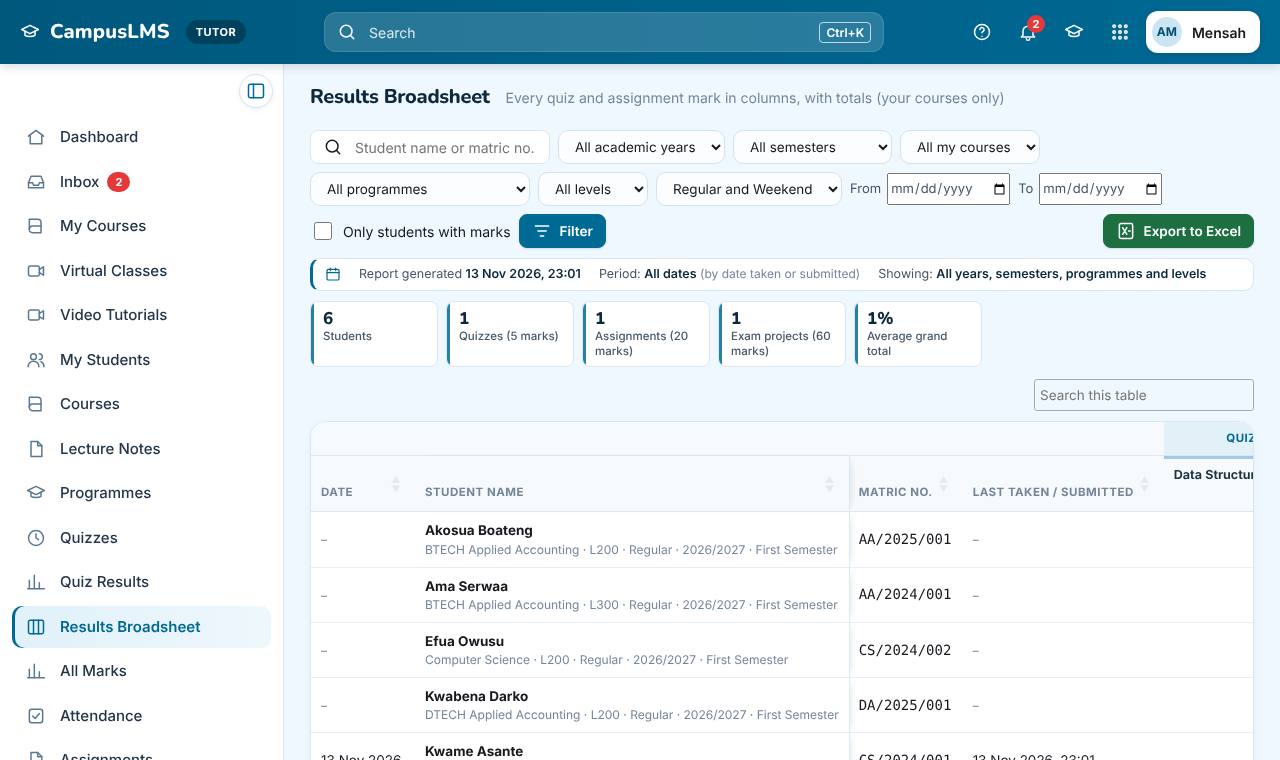
- Results Broadsheet: one row per student with a column per quiz (best attempt), assignment, class participation and exam project, then the totals and the grand total. Filter by academic year, course, programme, level, study mode and dates, and export to Excel.
- All Marks: every individual mark (quizzes, assignments, participation, exam projects) with filters for type, course, year, semester, programme, level, study mode, dates and student, plus Copy, CSV, Excel, PDF and Print buttons.
3.13 Video tutorials
Video Tutorials shows the same library as students see. Watch and download videos and their notes to use in class. To add or change videos in the library, send them to the administrator.
3.14 Good practice and problems
- Set the programme, level, semester and academic year carefully on every quiz, assignment, exam project and attendance sheet. Students outside those settings will not see it.
- Test a new quiz with a few questions before the class, and check its opening and closing times (they use the school's time zone).
- Give students enough time and attempts for poor connections; reset an attempt when a student had a genuine problem.
- Upload large videos and notes on a steady connection and keep the page open until the upload completes.
- Export results regularly to Excel as a backup of your records.
| Problem | What to do |
|---|---|
| A student cannot see my quiz or assignment. | Check the programme, level, semester, academic year and course on it, that it is enabled or published, and that the student is enrolled. |
| The CSV question upload fails. | Use the Template, keep the header row, save as CSV UTF-8, and put any text containing a comma in double quotes. |
| A student's attendance number was taken by someone else. | The sheet shows who used it. Reject the wrong entry and use Mark present for the right student. |
| A student lost time in a quiz. | Reset the quiz for that student so they can start again. |
Menu quick reference
| Menu item | Who | What it is for |
|---|---|---|
| Dashboard | Students, tutors | Home page. Students: activity, online classes, my courses, end of semester project and lecture notes. |
| Inbox | Students, tutors | Messages and announcements, including class links with a Join the class button. |
| Virtual Classes | Tutors | Send a Google Meet, Zoom or Teams class link to the students of a course; see who opened it; cancel a class. |
| My Courses | Students, tutors | Your enrolled or taught courses. |
| Course Catalogue | Students | Join courses for your programme and level. |
| Video Tutorials | Students, tutors | Watch and download video lessons and their notes. |
| Lecture Notes | Students, tutors | Students download notes; tutors upload them. |
| My Quizzes / Quizzes | Students / tutors | Take quizzes / create quizzes and questions. |
| My Results / Quiz Results | Students / tutors | Your marks / everybody's quiz results. |
| Attendance | Students, tutors | Mark attendance / run attendance sheets. |
| Assignments | Students, tutors | Submit work / set and mark work. |
| Exam Projects | Students, tutors | Submit / set and mark the end of semester project. |
| My Students, Courses, Programmes | Tutors | Your students, courses and programmes. |
| Class Participation, Results Broadsheet, All Marks | Tutors | Participation marks and full mark reports. |
| User Guide | Everyone | This guide, online and as a PDF. |
| Profile, Sign out | Students, tutors | Your details and password; leave the system. |
| My learning (portal) | Public students | Learning materials, video tutorials, inbox and messages. |
Words used in the system
| Word | Meaning |
|---|---|
| Matric number | A registered student's school number. It is the login ID. |
| Special ID | The sign-in name a public student chooses when enrolling. |
| Secret code | The code the administrator sends a public student, used with the special ID to sign in. It expires on a set date and works on one device at a time. |
| Academic year, semester, level | For example 2026/2027, First semester, Level 200. Work is given to students by these. |
| Study mode | Regular or Weekend. |
| Attempt | One try at a quiz. Starting a quiz uses an attempt. |
| Exam project | The end of semester project submitted by students and marked by staff; its marks are not shown to students. |
| Broadsheet | A table of all students' marks with totals. |
This guide covers public students, registered students and tutors. Questions about it can be sent with Message the admin on the main page.